
 Scanned Document Indexing
Use SimpleIndex to automate the process of assigning keyword index values to scanned documents and minimize data entry, keystrokes, and errors. SimpleIndex uses dynamic OCR with complex pattern matching to find index values anywhere on a page and/or bar codes to index scanned documents automatically.
Once captured, structured data can be used to populate a database, document management system, SharePoint, and other repositories.
SimpleIndex can simultaneously process MS Office, PDF, text, HTML and other files using the same pattern matching technology. If the file already has text, SimpleIndex uses it for increased speed and accuracy, falling back on OCR for images and scanned document indexing.

Features
 SimpleIndex is the perfect solution for small business and departments looking to manage their files from a single interface, developers who don’t want to reinvent the wheel and large companies with many locations looking to decentralize their scanning.
SimpleIndex organizes scanned images and electronic documents into a single document management database your employees can access on their desktops.
SimpleIndex takes the labor out of document imaging by providing powerful barcode recognition and OCR search algorithms that can find index values no matter where they are on the page. By providing these essential automations for a reasonable price, we make document management affordable for anyone.
The most unique automation is our OCR template and dictionary matching search algorithms. This lets you find information like date, customer name, invoice number and other information on documents with different layouts. These can even be applied to the text in Office documents and PDF files to organize these files automatically and attach them to a database.
 The SimpleCoversheet barcode printing application lets anyone in your company print bar-coded coversheets with all the information needed to identify a document. This is perfect for scanning with a centralized scanner or networked digital copier. SimpleIndex can then be configured to process these documents automatically without any user intervention whatsoever!
This level of automation is provided by SimpleIndex‘s command line interface. All the settings related to scanning or searching documents can be saved to “Job Files”, which can be saved to an icon and launched with a click of the mouse or a single line of code. These jobs can be configured to scan documents, read barcodes and OCR, generate folders and filenames and upload the index information to a database in a single step.
It is simply not possible to find an easier, faster way to process your documents!
Key Features and Recent Enhancements
- SimpleIndex Standard has Tesseract OCR and DTK Barcode engines. These provide good recognition on clean originals.
- SimpleIndex Professional adds ABBYY FineReader OCR Engine, ICR handprint recognition, ISIS Scanning, and Cloud OCR. These are able to recognize hard-to-read text and bar codes, and improve overall speed and accuracy.
- Process existing text in PDF files and MS Office documents in all versions.
- OCR


- Pro version includes ABBYY® FineReader Engine for faster, more accurate OCR
- Searchable PDF output
- Clipboard / Screen Shot OCR
- Point-Click OCR – Click on text to send it to an index field
- Enhanced OCR Options – match against other indexes, skip OCR on files with existing text
- Support for international character sets using Unicode
- Bar Code Recognition


- Multi-engine Barcode voting to boost accuracy (Professional version)
- Support for most 2D barcodes in all versions
- User-defined Barcode delimiter – no longer restricted to “|” for parsing multi-index barcodes
- Find/Replace characters in barcodes for matching or autofill
- TWAIN and ISIS Scanning


- TWAIN support in all versions. ISIS support available as an add-on or in Pro version.
- Improved real-time image processing
- Multiple scan windows when using ISIS
- Scan directly to a network folder (processing occurs during scan)
- Desktop Processing


- Selectively reprocess files
- Run multiple copies of SimpleIndex simultaneously
- Save any image region to a separate file for signature capture, etc.
- Server Processing


- Run multiple jobs on different schedules
- Run multiple copies of the same job for parallel processing and increased throughput
- Server licenses can be purchased in 1 Million Page per Year increments as an add-on to any workstation license
- Unlimited page barcode processing license available with Advanced Barcode Server
- Server processing compatible with Windows 7 or above and all Windows Server versions
- PDF Handling


- Support for reading and writing password protected PDF files
- Convert MS Office, HTML, XML and images to PDF before processing
- Searchable PDF output
- Native PDF Viewer – no dependence on 3rd party software
- PDF Auto-repair – attempts correction of bad PDF files
- Indexing


- Return MD5 hash values
- Configure default values for empty fields
- Export to XML
- Edit Fixed Fields – make changes to auto-generated indexes
- SharePoint Integration


- Compatible with all versions of SharePoint and SharePoint Online
- Append to or replace existing files in SharePoint
- Automatically match index fields to SharePoint columns to populate data
Website Resources
SimpleIndex.com is full of information and interactive content to help you learn what you need to know to implement SimpleIndex in your organization.
- Design Philosophy & Getting Started Guide
An introduction to the way SimpleIndex approaches document processing - Bringing Document Imaging to Everyone
How Simple Software solutions reduce the cost of entry into the Paperless Office - Sample Applications
Examples of different ways you can put SimpleIndex to use - Compare SimpleIndex to the Competition
Videos showing the same batch of documents being scanned and indexed with SimpleIndex as well as 4 top desktop document capture applications. - Top Features of SimpleIndex
Detailed information on the automated scanning and indexing features of SimpleIndex - Demonstration Videos
See how SimpleIndex automates indexing with OCR and barcode recognition - Simple Software University
Online training videos teaching all aspects of Simple Software configuration - Simple Software FAQ
Answers to common questions about Simple Software products - How Many Clicks does it Take to Scan My Documents?
Printable brochure in PDF format
SimpleIndex Applications in Your Industry
PDF brochures outlining some of the applications for SimpleIndex in various industries.

SimpleIndex Feature Highlights
Links to more information on the major features of SimpleIndex.
- Streamlined Document Capture
Ways that SimpleIndex helps reduce labor by streamlining the workflow and automating common indexing tasks - TWAIN and ISIS Scanner Driver Support
Use any scanner with SimpleIndex - Zone, Full Page and Dynamic OCR
Extract index data no matter where it appears on the page - Barcode Recognition
Read barcodes from scanned images to automate indexing - Optical Mark Recognition (OMR)
Read check boxes to find True/False or Yes/No values - Index Autofill
Populate multiple search fields with existing data from your database - Electronic Imprinting
Apply bates stamps and other image stamps/endorsements electronically - Database Integration
A full range of interactive database features allow for creative integration with custom database applications - Document Presence Auditing
Make sure that all required documents are present in the batch before it is released - Document Retrieval Options
How to find and view files once you have indexed them with SimpleIndex - Command Line Processing and Custom Application Integration
The SimpleIndex command-line interface makes it the easiest document capture application to integrate with your custom business software - Enable Distributed Document Capture
Companies with many remote locations can now afford to implement Distributed Capture with SimpleIndex
The Simple Software Imaging Suite
 These applications enhance and expand the functionality of SimpleIndex by providing barcode printing, automatic uploading, quality control and direct integration with popular applications like QuickBooks.
Top Features
The following is a list of the Top 25 major document capture features of SimpleIndex, in no particular order.
- Indexing support for all file types
- Viewing support for any installed, OLE-enabled application
- No monthly page processing limitations
- Text processing support for OCR’d images, PDF files and MS Office documents
- Barcode Recognition
- Dynamic & Zone OCR
- Manual Zone OCR by indexing operator
- Full-Page OCR to text, MS Word or HTML
- Optical Mark Recognition (OMR)
- Unstructured data capture using Template and Dictionary Matching
- ODBC & OLEDB database connectivity
- Use any database to store index data for document management and retrieval
- Automatic population of index fields using database lookup (Autofill)
- Document Presence Auditing – ensures all required pages are present in each batch
- Clipboard / Screen Shot OCR
- Command line execution
- Input from any TWAIN or ISIS scanner or network folder
- Media Wizard to create royalty-free, searchable document CDs or DVDs
- Output images to TIFF, JPEG, PDF or PDF/A
- Page Order Validation: reads the page number from each page with OCR and compare it to the scanned page order.
- Double-Index Validation: compare the value of two fields during unattended processing and automatically route documents to exceptions when the values don’t match.
- Automatic forwarding of a copy of the first page: from each exported file a first page is forwarded to a separate folder for data processing.
- Integrated document separation: combines pages into multi-page documents without the need for a 2-step configuration.
- Output index information to database or comma-delimited text file
- Blank page detection and deletion
- SharePoint 2010 Integration
- Auto-Rotate
- Easy-to-use cropping and redaction tools to remove confidential parts of images
- Electronic imprinting and bates stamping
New versions History
Simple Software is always working on updating and upgrading. Here you can find change log for SimpleIndex.
Learn More:
- More products from Simple Software.
- How to create searchable PDF files using optical character recognition software?
- Convert scanned documents or PDF files to Excel, Google Sheets, CSV and other spreadsheet formats.
- Creating dataflow from text to Databases.
- Everything about Document Management
- Batch OCR for Full-Text Conversion & Searchable PDF.
- Enterprise OCR Servers let you perform OCR on thousands of documents at a time.
- OCR to process Invoices.
- What is OCR Data Capture?
- But what if I need to process a lot of specific medical forms (CMS 1500, UB-04, or J430 Dental Claims Forms)?
- OCR to process loan forms for Real Estate agents and Mortgage brokers.
KB Articles for OCR Features
- Language Pack for Standard/Tesseract OCR
- Languages Supported in SimpleSoftware OCR Engines
- What is Document Imaging?
- Change the Dictionary Separator Value
- Change the OCR Font or Type
- Regular Expression (RegEx) - Syntax or Type
- Autonumber Increment Value
- I'm using full page OCR. The information is all appearing in the txt file but it is losing format about half way through. Data to the right is ending up at the end of the txt doc. Can this be fixed?
- Is there a way to just use part of a bar code or OCR value? For example, extract "50" from the value "124450"
- If I have a form which is filled manually by hand, can SimpleIndex read the data from it?
Exclude Index Field from Index Log
Please refer to the Wiki Documentation for the complete Index & Batch Logging reference.
Many times when outputting a Log file via CSV, XML, TXT, etc. there will be index fields that are required in the Job Configuration, but not desired to be output in the Index Log. In those cases those fields can be excluded from the Index Log with a “~” character at the end of the Index Field Name.
To do this go into the Job Options/Job Settings Wizard, go to the Index tab/step, find the Index field that you want to exclude from the Index Log and add this to the end of the field name: ~
EX. The original Index Name is “OCR Text” and that field should be excluded from the Index Log, so it doesn’t appear. This field should be changed to “OCR Text~”.
Export Issues and Missing Images after Export
Please refer to the Wiki Documentation for the complete Export Settings reference.
If you are having issues with the files not exporting properly or you have missing images in the export folder that should have been saved, then a registry key needs to be added to correct this. This registry key changes the export process from the faster process that SimpleIndex uses by default, to a slower export process that will avoid these issues.
Instructions:
1. Search for
“regedit” on your computer.
2. Navigate to this
folder in the Registry Editor window:
Computer\HKEY_LOCAL_MACHINE\SOFTWARE\WOW6432Node\SimpleIndex\Misc
3. In the right
pane of the Registry Editor window Right Click and select New>String Value
4. Set the name of
the file to this: EnableAtalaExport
5. Double click on
the “EnableAtalaExport” registry key, set the Value to “0”
(Zero) and click OK.
Large Documents (>500 pages) are Slow to Process
When working with PDF image files containing a high number of pages (typically in excess of 500, but can vary by file and PC running the job) SimpleIndex may run into performance issues as it attempts to hold all of those pages in memory and perform the requested operations (full-text OCR in particular can tax a system in these circumstances).
SimpleIndex 11:
Use the Fast Import and Fast Export options to use our new, optimized import and export that can split or merge PDF files with thousands of pages in a matter of seconds. These options disable the optional features that require the slower import and export operations and allow for much faster processing.
Older Versions of SimpleIndex:
A workaround in this scenario is to convert the large PDF to a folder of smaller PDFs files that can be managed more easily. In order to minimize the impact on production and tax the user(s) with extra steps, you can use a third-party splitting tool that can be called from the Command Line. One such option that has worked well is PDFSplitter from CoolUtils
One way to automate this process is to use PDFSplitter’s command line ability in conjunction with SimpleIndex’s Pre-processing function. For simplicity let’s consider a 600 page PDF with a filename generated at the time of scanning using indexes provided on a coversheet or keyed by an operator. The goal now is to take that large file and perform a full-text conversion on it.
Our SimpleIndex job, Full Page OCR.sic let’s say, launches and before getting to work calls PDFSplitter from the Pre-processing step with a command such as
PDFSplitter.exe “C:\Images\Smith – John – Medical History.pdf” C:\Images\Pages\ -cp 100
PDFSplitter will run and break that document every 100 pages creating 6 PDFs in the folder C:\Images\Pages. It maintains the original filename, simply adding “001-100” and so on to the name. After PDFSplitter is complete the Full Page OCR job begins its process and, given that the original filename is still part of the split files’ naming schema, it can produce one full-text PDF in the final output folder.
Related Wiki Help Pages:
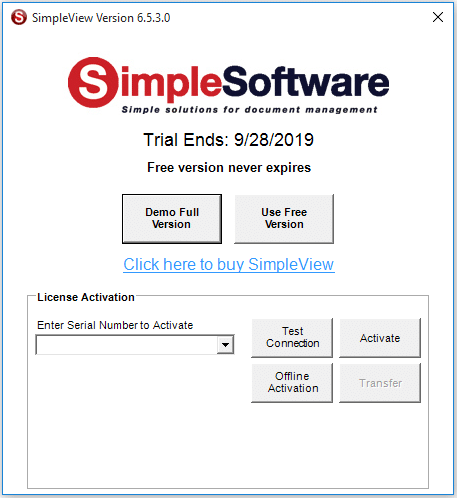
How to activate SimpleView?
Please refer to the Wiki Documentation for the complete SimpleView Application reference.
Activation Instructions
SimpleView Option A – New SimpleIndex Installation:
If you are installing SimpleView on the Windows computer for the first time first download SimpleIndex from the SimpleIndex Demo Installation Link.Once the SimpleIndex software has been downloaded install the software from the downloaded installation file.

During the installation process you will be asked to enter your Serial Code or Serial Codes.
Single Serial Code:

Multiple Serial Codes (separate with a comma):

After you have entered your Serial Code(s) click Next to move through the installation process.
Once the installation is complete you will receive the following Window:

SimpleView Option B – SimpleView Already Installed:
If you have already installed the SimpleView software then all you need to do is Activate the demo.
Click the SimpleView icon from the SimpleIndex software or from your Windows Start menu.

Enter your Serial Number into the “Enter Serial Number to Activate” field in the Activation Window.

Click the Activate button to activate the license.

You will receive a confirmation that the license was properly activated and your license type will be displayed next to the “License Type:” section of the Activation Window.
SimpleView Option C – SimpleView Installed on Computer Not Connected to the Internet:
If you would like to install SimpleView on a computer that doesn’t have an internet connection an Offline Activation will need to be done.
First fully install the SimpleView software without activation.
Click the SimpleView icon from the SimpleIndex software or from your Windows Start menu.
Enter your Serial Number into the “Enter Serial Number to Activate” field in the Activation Window.
Click the “Offline Activation” button.

Click OK in the “SimpleView Offline Activation” window, which asks you to call or email for an Offline Activation.

Select the license version that you ordered in the “SimpleView Version” drop down.
Then either call (865) 637-8986 option 2 or email support@simpleindex.com with the Authorization Request Code. We will the provide you with the Activation Key.
Enter the Activation Key and then click the Offline Activation button.
Maintenance is optional, but covers tech support and upgrades for the software. Please consider purchasing maintenance if you haven’t already. Please refer to Simple Software Maintenance Agreement for more information.
How to activate any Add-on or Upgrade to SimpleIndex?
Please refer to the Wiki Documentation for the complete Licensing & Activation reference.
SimpleIndex Add-on Option A – New SimpleIndex Installation:
If you are installing SimpleIndex on the Windows computer for the first time first download SimpleIndex from the SimpleIndex Download Page.
Once the SimpleIndex software has been downloaded install the software from the downloaded installation file.
During the installation process you will be asked to enter your Serial Code or Serial Codes.
Single Serial Code:
Multiple Serial Codes (separate with a comma):
After you have entered your Serial Code(s) click Next to move through the installation process.
Once the installation is complete you will receive the following Window:
When you click Finish you will receive the Global Settings Wizard window to configure the general settings for SimpleIndex on the installed computer.

Move through the prompts to configure the Global Settings Wizard. Once complete you will receive a confirmation that the License was properly activated before the software opens.
SimpleIndex Add-on Option B – SimpleIndex Already Installed:
If you have already installed the SimpleIndex software then all you need to do is Activate the demo.
Click the SimpleIndex icon on your desktop or from your Windows Start menu.

Once SimpleIndex is open go to the Help menu and Select Activate/Transfer License.
Enter your Serial Number into the “Enter Serial Number to Activate” field in the Activation Window.

Click the Activate button to activate the license.
You will receive a confirmation that the license was properly activated and your license type will be displayed next to the “License Type:” section of the Activation Window.
SimpleIndex Add-on Option C – SimpleIndex Installed on Computer Not Connected to the Internet:
If you have installed SimpleIndex on a computer that doesn’t have an internet connection an Offline Activation will need to be done.
First fully install the SimpleIndex software without activation.
Once it has been fully installed click the SimpleIndex icon on your desktop or from your Windows Start menu.

Once SimpleIndex is open go to the Help menu and select Activate/Transfer License.
Enter your Serial Number into the “Enter Serial Number to Activate” field in the Activation Window.
Click the “Offline Activation” button.
Click OK in the “SimpleIndex Offline Activation” window, which asks you to call or email for an Offline Activation.

Select the license version that you ordered in the “SimpleIndex Version” drop down.
Then either call (865) 637-8986 option 2 or email support@simpleindex.com with the Authorization Request Code. We will the provide you with the Activation Key.
Enter the Activation Key and then click the Offline Activation button.
Maintenance is optional, but covers tech support and upgrades for the software. Please consider purchasing maintenance if you haven’t already. Please refer to Simple Software Maintenance Agreement for more information.
What is Document Imaging?
Document Imaging was the more commonly used term in the early days of document scanning and OCR and refers to any system used to replicate documents used in business. It evolved from the microfilm days where it was referred to as Document Image Management.
Document Imaging allows for the scanning of paper documents, as well as the processing of files saved electronically. These files are then named and saved for later searching.
Other document imaging terms include automatic imaging software, best digital imaging software, best imaging software, desktop imaging software, digital document imaging, digital imaging software, document imaging download, document imaging PDF, document imaging processing, document imaging products, document imaging software, document imaging solution, document imaging solutions, document imaging systems, document imaging technologies, document imaging technology, document imaging tools, image to database, imaging resource, imaging scanning software, imaging software companies, imaging software download, imaging software for windows, imaging solution, scanner imaging software, scanning and imaging, scanning imaging, and software for imaging.
Enable Post-Process when Input Folder is Empty
Please refer to the Wiki Documentation for the complete Advanced Settings reference.
When you have multiple Job Configurations running in tandem with the Post-Process command line running one after there other there can be occasions where a Job Configuration earlier in the chain doesn’t have any images in the Input folder. When this happens a prompt occurs that must be clicked to proceed to the the next Job Configuration. When running unattended this can cause issues when the process stops for this prompt. This can be turned off in the Job Configuration’s XML settings.
Instructions for suppressing prompt to continue when Input folder is empty:
- Right click on the Job Configuration file that you would like to suppress the prompt on and select Open With>Notepad
- Search the XML settings text open in Notepad for this term:
<POSTPROCEMPTY> - Set the value between from “True” to “False”. It should look like this:
<POSTPROCEMPTY>False</POSTPROCEMPTY> - Save and close the file.
Index With Non-Latin Character Sets
Please refer to the Wiki Documentation for the complete Languages reference.
By default SimpleIndex uses the ANSI character set to display and edit captured OCR data, index field values and full-text OCR. This works for all languages based on the Latin alphabet (English, French, Spanish, German, etc.)
To index documents in other languages like Chinese, Japanese, Russian, Arabic and other non-Latin alphabets, set the default character set using this registry key. If the key is not set correctly then Unicode text will show up as ??????????.
Use Notepad to edit the “Charset” value from the sample setting below and save it to a .reg file. Then double-click the .reg file to install (Administrator privileges required).
You can download the .reg file here but you still need to edit in Notepad to set the Charset value before installing.
If you are on a 32-bit operating system be sure to remove the extra “\WOW6432Node” from the registry path.
[HKEY_LOCAL_MACHINE\SOFTWARE\WOW6432Node\SimpleIndex\Misc]“Charset”=”1”
| Charset Name | Charset Value |
| ANSI_CHARSET (Latin) | 0 |
| DEFAULT_CHARSET | 1 |
| SYMBOL_CHARSET | 2 |
| SHIFTJIS_CHARSET (Japanese) | 128 |
| HANGUL_CHARSET (Korean) | 129 |
| GB2312_CHARSET (Simplified Chinese) | 134 |
| CHINESEBIG5_CHARSET (Chinese) | 136 |
| GREEK_CHARSET (Greek) | 161 |
| TURKISH_CHARSET (Turkish) | 162 |
| HEBREW_CHARSET (Hebrew) | 177 |
| ARABIC_CHARSET (Arabic) | 178 |
| BALTIC_CHARSET (Baltic) | 186 |
| RUSSIAN_CHARSET (Russian) | 204 |
| THAI_CHARSET (Thai) | 222 |
| EE_CHARSET | 238 |
| OEM_CHARSET | 255 |

The full list of values is at https://msdn.microsoft.com/en-us/library/cc194829.aspx.
Skip to Blank Index on Save Index
Please refer to the Wiki Documentation for the complete Index & Batch Logging reference.
If you would like to have SimpleIndex automatically go to the next page with a blank field and highlight that field when the Save Index button or Enter a change to the XML text of the Job Configuration is needed. This can be useful to quickly move to the next document that has a blank Index field.
Instructions to set Skip to Blank index on Save Index:
- Right click on the Job Configuration file that you would like to suppress the prompt on and select Open With>Notepad
- Search the XML settings text open in Notepad for this term:
<SKIP_TO_NEXT_BLANK> - Set the value between from “False” to “True”
<SKIP_TO_NEXT_BLANK>True</SKIP_TO_NEXT_BLANK> - Save and close the file.
Max List Size
Please refer to the Wiki Documentation for the complete File Output Settings reference.
If you have a field that has a list and it loads very slowly then the size of the list that it loads needs to be limited.
You first open the Registry or regedit. Then you find this location: Computer\HKEY_LOCAL_MACHINE\SOFTWARE\Wow6432Node\SimpleIndex\Misc
Then you right click in the space to the right and select New>String Value
Then you name this new entry this: MaxListSize
Then you double click on it and set the size of the list that it loads. We suggest somewhere between 1000 and 5000

Is SimpleIndex for Windows only? I’m a Mac user.
Please refer to the Wiki Documentation for the complete Installation reference.
Unfortunately SimpleIndex is for Windows only. This is true of most high speed document scanning applications, due to the fact that most document scanners only have Windows drivers.
However, SimpleIndex can output to databases and file shares on a Mac server. The fact that it does not have its own proprietary file system and database makes it a very good choice for Mac networks, since only the scanning workstation needs to be a PC.
Likewise, many users have reported great success running Parallels or Bootcamp on their Mac to allow the use of a Windows OS
- Published in Licensing & Installation
How much do Simple Software products cost?
Click here for the latest pricing and online ordering information. You can also purchase full service solutions from one of our Authorized Dealers.
Click here for a PDF version of the price list and a feature matrix that shows which features are included in each version.
All applications are activated online by entering a serial number in the demo. The serial is emailed to you once your order is processed.
- Published in Licensing & Installation, LoanStacker, SimpleCoversheet, SimpleExport, SimpleQB, SimpleSend, SimpleView
If it possible for index values to be keyed twice to ensure accuracy (double-key verification)?
Please refer to the Wiki Documentation for the complete Database reference.
There are two ways to do double-key verification in SimpleIndex.
When there is one operator, simply configure 2 index fields with the same name. The index value can only be saved if the 2 fields match.
If there are multiple operators, you can accomplish the same thing using “Database Update Mode”. The first user keys the value, and that is saved in the database to Field 1. The 2nd user uses a configuration that has two fields with the same name–one that reads the value from Field 1 and another that is mapped to Field 2 (initially blank). The 2nd user keys the value into Field 2 and will only be allowed to save it if the value matches Field 1.
We recommend contacting our professional services department before attempting to setup double-key verification in a multi-user environment, as this is one of the more complicated configurations that SimpleIndex supports.
- Published in Indexing & UI
How do you configure a field to select from a list of possible values?
Please refer to the Wiki Documentation for the complete Index & Batch Logging reference.
List fields are populated using a text file or database field containing the values for that list. The text file scenario will be described first.
To configure a list field, go to the Index tab in the Job Options. Create a list field by selecting “List” for the field type and give it a name. In the “List File/Field” setting for this field, put the full path or UNC to the text file containing the list or click “Set” to browse to the file. If you have not created a file, you can put the path where you want the file stored here and click the “Edit” button. This will open the file in Notepad; new files will prompt you to create them.
On each line of the text file you will put one of the possible values that you want to be able to select from while you are indexing with SimpleIndex. You can copy this information from another source and paste it into the text file.
Save the file in Notepad and close it. The List field is now configured!
To use a database field, your configuration must be connected to a database using the settings on the Database tab. Any fields defined as “List” on the Index tab that have a corresponding field mapped on the Database tab will use the unique values from that field to populate the list.
You can check “Only allow values in list” to disallow users from entering a value not in the list.
Once the List index field is configured properly you can select the values from a drop down after scanning that appear in the main SimpleIndex window while indexing. It also makes the field autofill the closest match from the list based on the characters that you type in that field.
- Published in Indexing & UI
How do I configure the output folder and file naming scheme?
Use the Folder and Filename check boxes on the Indexing & File Naming step in the Job Settings Wizard to indicate whether field values will be used to generate subfolders or filenames. Any field with the Folder option checked will create nested subfolders for each value in the order the fields are listed. Any field with the Filename checked will have the values concatenated to form the filename.

For example, if Field 1 and Field 3 have the Folder option checked, and Field 2 and Field 3 have the Filename option checked, image filenames will be created in the format:
%OUTPUTFOLDER%\Field 1\Field 3\Field 2 – Field 3.tif
The Filename Separator option on the Advanced tab lets you change the ” – ” between the fields in the filename to anything you want.
Related Pages
- Published in Export
Automatic Indexing Using Existing Data
Automatic Indexing Using Existing Data

The Autofill feature of SimpleIndex is an easy way to associate many index fields with one document without retyping data that already exists in another database. Autofill uses a database lookup to retrieve records that match a key value entered by the user. Blank index fields are then filled in automatically with the data from this lookup. The result is a document database with many different possible search fields, of which only one needed to be entered during scanning.
The key field may be typed by the user, or it may be read from the document automatically using barcode recognition or OCR. The lookup is performed either when the user changes this field or when the index values are saved. If the lookup finds multiple matching records, the user will be notified and the first set of values will be used by default.
When used with pre-index batches, key information can be read automatically from barcodes or OCR and matched to database records with a single click. Search on up to 99 index fields without a single keystroke!
Learn More:


KB Articles for Automatic Indexing
- Exclude Index Field from Index Log
- Turn Off Prompts and Pop Ups on Job Configurations
- Change the Font Size of Index Fields
- Large Documents (>500 pages) are Slow to Process
- Regular Expression (RegEx) - Syntax or Type
- Index With Non-Latin Character Sets
- Skip to Blank Index on Save Index
- Stop Autorun When Double Clicking Configuration
- Autonumber Increment Value
- Overlap of SimpleView Viewer in SimpleIndex Display
- 1
- 2
