Batch Processing Stages: Difference between revisions
| Line 13: | Line 13: | ||
[[Image clean-up]], [[OCR]], and [[barcode recognition]] are performed automatically. If the batch is large, [[OCR]] processing may take several minutes. In this case, the user may do work in another application while processing and return to the batch once processing is finished. | [[Image clean-up]], [[OCR]], and [[barcode recognition]] are performed automatically. If the batch is large, [[OCR]] processing may take several minutes. In this case, the user may do work in another application while processing and return to the batch once processing is finished. | ||
== | == Image Review and Data Verification == | ||
Each image is displayed to the user, and they are able to enter index information or correct the values from OCR or barcode recognition. | Each image is displayed to the user, and they are able to enter index information or correct the values from OCR or barcode recognition. | ||
Revision as of 17:20, 16 January 2022
This section describes the steps involved in batch processing, how to initiate each step, and the manual processing options available to the user during a batch.
Start Batch[edit | edit source]
Start the batch by pressing the Run Job button (green traffic light icon) on the toolbar.
Input Files[edit | edit source]
Depending on the Input Type, scanning will start automatically or images are moved from the Input folder to a temporary processing folder.
Automatic Processing[edit | edit source]
Image clean-up, OCR, and barcode recognition are performed automatically. If the batch is large, OCR processing may take several minutes. In this case, the user may do work in another application while processing and return to the batch once processing is finished.
Image Review and Data Verification[edit | edit source]
Each image is displayed to the user, and they are able to enter index information or correct the values from OCR or barcode recognition.
See Verification
Mouse Action Options[edit | edit source]
Choose what happens when you select a region on the page with your mouse.
See Mouse Action
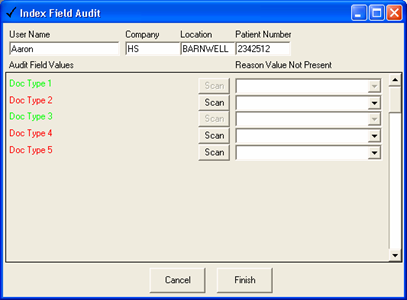
Document Presence Auditing[edit | edit source]

If an Audit Field is selected, the index field audit dialog will appear once all images have been indexed. The user is prompted to scan files not present in the batch or enter a justification for why the document is not present.
See Document Presence Auditing
Export Batch[edit | edit source]
Once all files have been indexed and the batch is audited, the files are exported. There are multiple steps in the export process, depending on the options you select.
See Export
Create Export Files[edit | edit source]
If multi-page files are used, the first step is to combine files in the current batch with the same index settings into multi-page files.
Imprint Files[edit | edit source]
If the Imprint option is selected, automatic watermarking of TIFF and PDF files will occur at this point in the process.
See Imprinting
Move Files[edit | edit source]
When multi-page files are used, the last step of the export process is to move files from the temporary processing folder to the Output folder. Depending on the Existing Files setting, pages from the current batch will replace existing files or are appended to the start or end of the document. If the Add bookmarks to PDF files option is selected, pages are inserted into the matching bookmarked sections in any existing file.
By performing the multi-page file export and move operations in two steps, SimpleIndex greatly improves performance when exporting to large, multi-page files on a network drive.