Welcome Screen: Difference between revisions
| (10 intermediate revisions by 2 users not shown) | |||
| Line 1: | Line 1: | ||
'''Back to [[Settings Wizard]]''' | |||
[[File | This screen lets you import fields from an existing [[Job File]] or third party app integration, and set the type of job to create. | ||
[[File:SI_Welcome-Screen-Settings.png|300px|thumb|right|alt=SimpleIndex Simple Setup Job Linking Process Welcome Screen|Settings Wizard Welcome Screen]] | |||
== Wizard Mode == | |||
Use Integrated Mode to import index field settings from your document management system and automatically specify an export format. Settings import modules are customized for each DMS and are not installed by default. Contact | <b>New Job</b> - Select New Job to create a new, blank job configuration with the default settings. This is used to configure new processes in SimpleIndex. | ||
<br><br> | |||
<b>Edit Job</b> - Select Edit Job to open a Job Configuration file for editing the settings. Clicking the Open Job button on the main SimpleIndex screen also performs that same function. | |||
<br><br> | |||
<b>Integrated Mode</b> - Use Integrated Mode to import index field settings from your document management system (DMS) and automatically specify an export format. Settings import modules are customized for each DMS and are not installed by default. [[Contact Support]] to request an import module for your DMS. | |||
== Input Type == | == Input Type == | ||
The steps required by the wizard depend on whether new files are scanned as part of the job workflow or existing files are imported from a folder. | The steps required by the wizard depend on whether new files are scanned as part of the job workflow or existing files are imported from a folder. | ||
* [[Scanner]] needs to be selected to scan directly with a computer attached scanner via TWAIN or ISIS driver. | |||
* [[Folder Input]] needs to be selected to import files from a folder that Windows File Explorer has access to, which includes local, network and some cloud based folders. | |||
* [[Email]] needs to be selected to import attachments from emails for processing. | |||
* [[Multi]] needs to be selected to use two or more of the [[Scanner]], [[Folder]] and [[Email]] input types. | |||
Several settings allow you to use the job configuration file name and folder as variables. Once the Input Type is selected you will be prompted to save the configuration file before continuing. This will be the location that the Job Configuration is saved to and where the user will select the Job Configuration to run the specific process needed. | |||
'''Next Step [[Scanner Settings]]''' | |||
Latest revision as of 16:33, 25 July 2023
Back to Settings Wizard
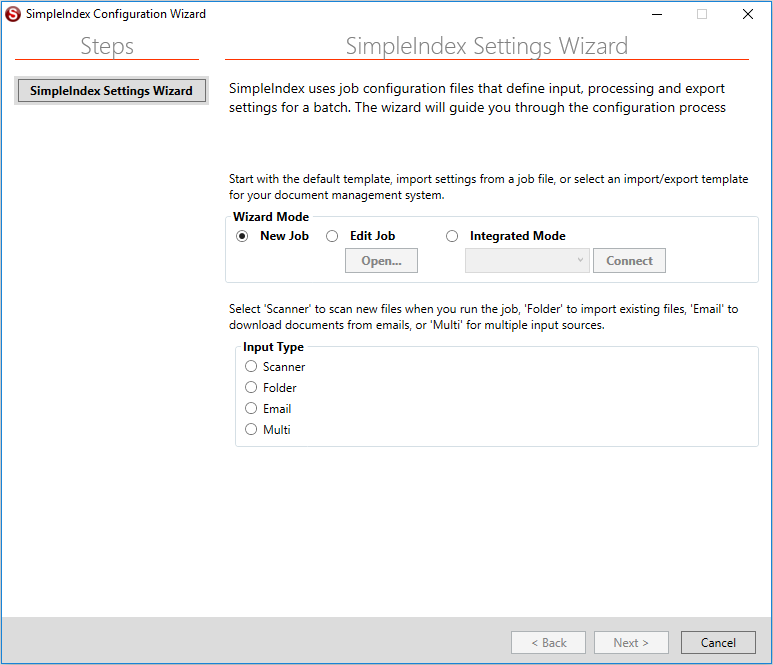
This screen lets you import fields from an existing Job File or third party app integration, and set the type of job to create.

Wizard Mode[edit | edit source]
New Job - Select New Job to create a new, blank job configuration with the default settings. This is used to configure new processes in SimpleIndex.
Edit Job - Select Edit Job to open a Job Configuration file for editing the settings. Clicking the Open Job button on the main SimpleIndex screen also performs that same function.
Integrated Mode - Use Integrated Mode to import index field settings from your document management system (DMS) and automatically specify an export format. Settings import modules are customized for each DMS and are not installed by default. Contact Support to request an import module for your DMS.
Input Type[edit | edit source]
The steps required by the wizard depend on whether new files are scanned as part of the job workflow or existing files are imported from a folder.
- Scanner needs to be selected to scan directly with a computer attached scanner via TWAIN or ISIS driver.
- Folder Input needs to be selected to import files from a folder that Windows File Explorer has access to, which includes local, network and some cloud based folders.
- Email needs to be selected to import attachments from emails for processing.
- Multi needs to be selected to use two or more of the Scanner, Folder and Email input types.
Several settings allow you to use the job configuration file name and folder as variables. Once the Input Type is selected you will be prompted to save the configuration file before continuing. This will be the location that the Job Configuration is saved to and where the user will select the Job Configuration to run the specific process needed.
Next Step Scanner Settings