Licensing & Activation
This section outlines some of the key components to a document scanning and indexing workflow and how SimpleIndex implements them. The actual settings screens will be easier to understand once the underlying concepts are explained.
Demo/Registration Screen[edit | edit source]
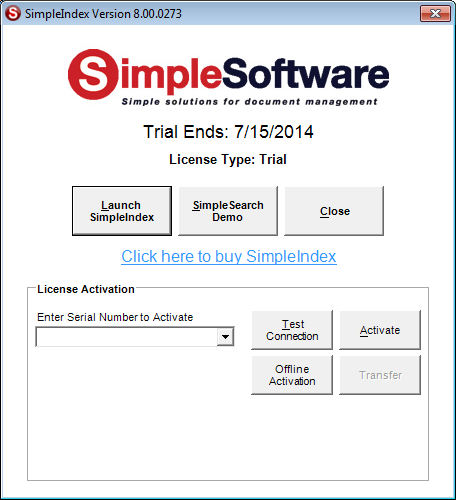
When SimpleIndex is first installed, it is automatically set to run in Demo Mode, with the expiration date set to 30 days after you first run the program. Demo Mode can run as SimpleIndex Full with all optional features enabled, or it can emulate the SimpleSearch view-only. You must restart SimpleIndex to switch between modes.
Starting in Demo Mode[edit | edit source]
To start SimpleIndex in demo mode, click Launch SimpleIndex. Click SimpleSearch Demo to emulate a search-only license. Close will exit the application.
License Activation[edit | edit source]
To register SimpleIndex, enter your serial number in the box and click Activate. If you are connected to the Internet, and no firewall is blocking it, SimpleIndex will connect to the activation server and register automatically.
If connectivity problems prevent communication with the activation server, you may activate offline by clicking the Offline Activation button and following the on-screen instructions.
Processing Stages[edit | edit source]
SimpleIndex is designed to process documents in the following stages, starting when the user clicks the Run Job button.
- Import images from the Input folder or scan new images (5.3.2)
- Process images, performing PDF Processing, Auto-rotate, OCR, Barcode Recognition, Despeckle and Deskew.
- Manually review images and index values from OCR and Barcode Recognition. Manually enter index values that are not populated automatically.
- Audit the batch (optional) to ensure all required documents are present and all index information is entered correctly.
- Export the images and index information to the Output folder. Subfolders and filenames are determined by the index options you select.
If enabled, Insert mode will create records in your database and populate them with the index values from this batch.
Index, batch, and audit log files are written to the Log folder and log files/database records are created.
SimpleIndex is unique because it performs all the enabled stages sequentially without user intervention. Other programs require a separate command to initiate each step, slowing productivity in single-workstation environments. When you click the Run Job button, SimpleIndex scans, processes, and exports the images automatically according to your configuration settings.
An even greater degree of automation can be achieved if all of the index values can be automated through Barcodes, OCR, or the Command Line Interface. Using Pre-Indexed batches, you can skip step 3 and perform scanning, processing, and export without any user intervention whatsoever. This allows you to run SimpleIndex by just double-clicking the job file, or by launching it from another program.
When configuring SimpleIndex, keep these stages in mind and think about what your particular job requires at each step. This will help you make sense of the many options available to you.
File Naming Schemes[edit | edit source]
SimpleIndex’s file naming parameters allow you to organize scanned documents logically using folders and filenames, making it easy for users to find the file they need using Windows Explorer. File naming conventions also allow you to link images to existing database records by assuming images are saved with a specific folder and filename, eliminating the need for data imports.
File naming conventions are how SimpleIndex combines pages in a multi-page document into a single file. If you are used to other document management applications, this may be a different way of doing things. SimpleIndex considers any set of images that have the same index values a single document. At the end of the job, the export file is determined by the index values, and matching images are combined into one multi-page file. This simplifies the indexing process and makes it possible for pages in a single document to occur non-consecutively in a batch. This also makes it possible to append pages to previously scanned documents at a later date.
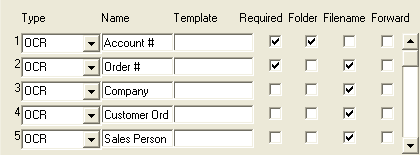
Each index field you define has the option to be used as a folder level or filename. When exporting, SimpleIndex goes through the index fields in order, creating folders for each field where Folder is checked, and creating the filename by linking the index values that have Filename checked. For the pictured example, if the Output folder is “c:\output” and the Field Separator is “-“ the files would be named:
C:\output\Account #\Order #-Company-Customer Order #-Sales Person.tif
Linking Jobs[edit | edit source]
Many scanning tasks are better performed in separate stages. For example, a large scanning operation may need several scanners and indexers working together. This can be accomplished by configuring the scanners to scan images to an intermediate folder, from which the indexers would then pull files, index them, and produce the final output. Using this technique, a wide variety of imaging tasks can be accomplished.
The database features are also useful in linking jobs. Insert mode can be used by scanning workstations to create new records, and Update mode can be used by unattended barcode/OCR processes and by indexers to review and correct the index information.
Finally, the Pre-Process and Post-Process options allow you to run any program from a command line automatically at the beginning or end of each batch. This is perfect for converting input files or performing post-processes on the output files to transform them to any format you need. You can also use it to initiate a database import or FTP upload. Since you may launch any application, there is no limit to the possibilities.
Starting the Settings Wizard[edit | edit source]
Select New Job Configuration from the File menu, or click the New Job icon to start the wizard for a new job configuration.
To edit an existing job configuration in the wizard, select Job Settings Wizard from the File menu, or click the Wizard button on the Job Options screen.
Welcome Screen[edit | edit source]
Wizard Mode[edit | edit source]
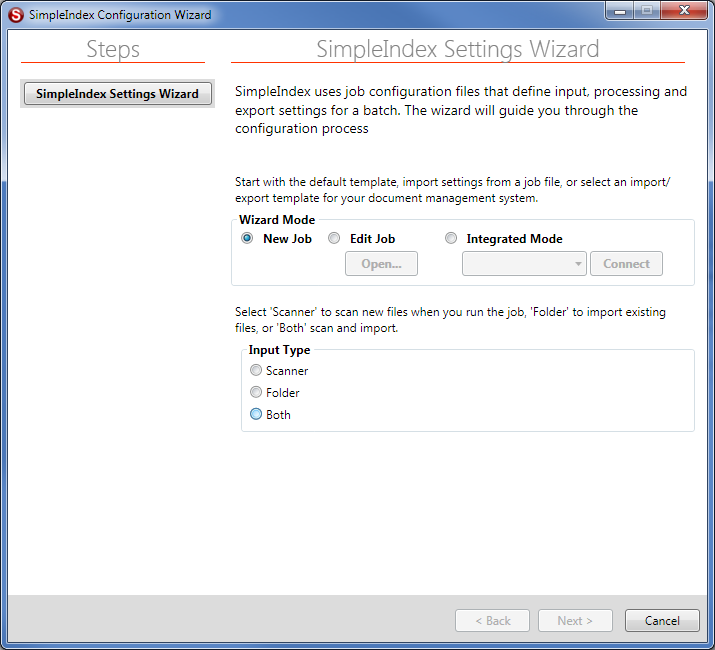
Select New Job to create a new, blank job configuration with the default settings.
Select Edit Job to open a job file for editing.
Use Integrated Mode to import index field settings from your document management system and automatically specify an export format. Settings import modules are customized for each DMS and are not installed by default. Contact support (0) to request an import module for your DMS.
Input Type[edit | edit source]
The steps required by the wizard depend on whether new files are scanned as part of the job workflow or existing files are imported from a folder. Select Scanner or Folder to indicate which type of job workflow to use. Select Both to process new scans and existing files in the same batch.
Several settings allow you to use the job configuration file name and folder as variables. Once the Input Type is selected you will be prompted to save the configuration file before continuing.
Scanner Settings[edit | edit source]
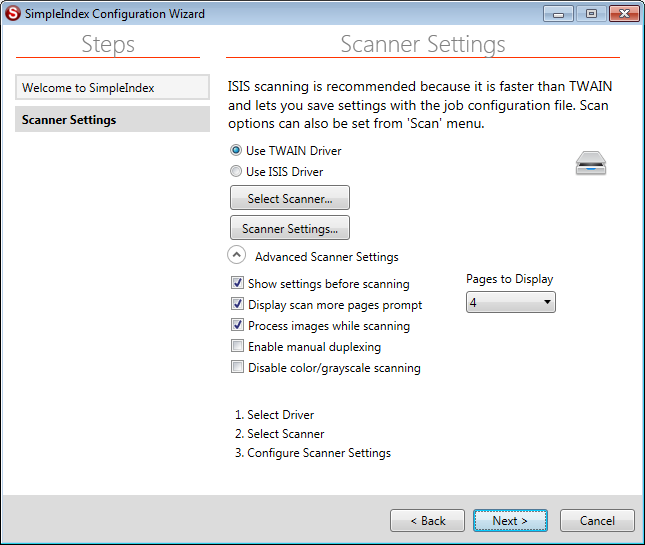
If Scanner was selected as the input type, the next screen is the Scanner Settings. Scanner settings are not available in the Job Options screen, since many of them need to be modified by the user during batch scanning. The corresponding settings can be found under the Scan menu, allowing users without the Admin password to change them.
TWAIN or ISIS Driver[edit | edit source]
TWAIN scanning is included with all versions of SimpleIndex. ISIS scanning is included in the Pro version or as an add-on to Standard. ISIS scanning is faster, especially on older computers, and lets you save the scanner settings to the job configuration file. This gives the administrator full control over the scanner settings so users don't have to change the scanner settings manually for different types of documents.
Advanced Scanner Settings[edit | edit source]
The Advanced Scanner Settings can be set from the Scan menu and full descriptions can be found in section. However there are two options that are not available from the Scan menu.
- Process images while scanning - perform image enhancement and barcode recognition in real time while scanning instead of in a separate processing stage. This means users don't have to wait for image processing to complete before the batch can be indexed or exported.
- Disable color/grayscale scanning - forces all images to be scanned in Black & White regardless of what settings are chosen in the TWAIN or ISIS driver interface.
Display Settings Before Scan[edit | edit source]
When this menu option is checked, the scanner settings dialog is automatically displayed before each new scan.
Display Scan More Prompt[edit | edit source]
This checkable menu item causes SimpleIndex to ask the user if s/he wants to scan more pages into the current batch. This helps if the scanner’s hopper is not big enough for all the pages, or if a jam interrupts scanning before the batch is complete.
Pages to Display[edit | edit source]
When scanning in ISIS mode, multiple pages can be displayed on the screen at once (up to 9). This option is not available in TWAIN mode. This is useful for viewing both sides of a duplex scan or multiple image streams at once.
Enable Manual Duplexing[edit | edit source]
Check this box to scan 2-sided documents on a simplex scanner. When scanning you will be prompted to scan the front side of the documents, flip the pages, and then scan the reverse side. The batch will contain both sides of each page in the correct order.
File Input Settings[edit | edit source]
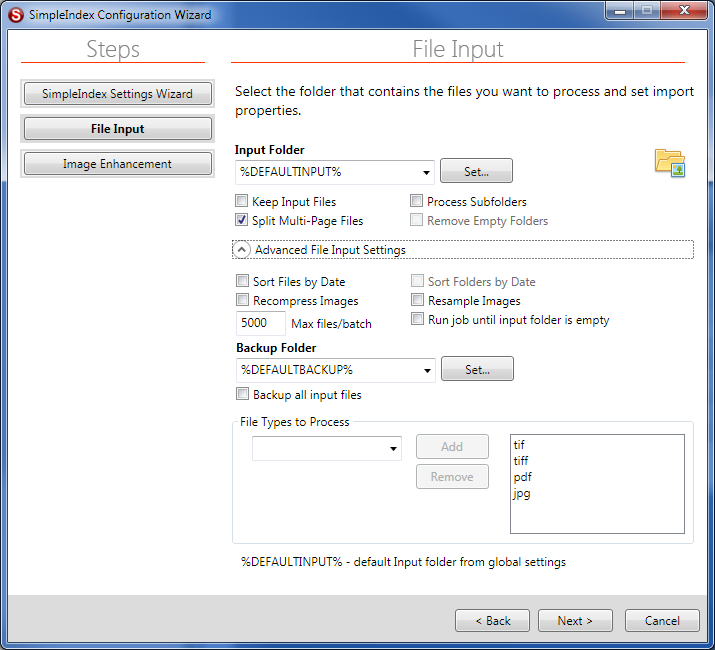
The File Input Settings screen is displayed when Folder is selected as the input type. These settings determine which files are imported, and what order they are processed.
Input Folder[edit | edit source]
The folder that new files will be imported from.
Keep Import Files[edit | edit source]
Select this option to keep all of the original files in the input folder instead of removing them as they are processed. This option is useful when testing configuration settings, as well as for re-organizing documents while leaving the originals intact. This option is also necessary to prevent errors when the Input folder is read-only.
When using the Last batch time () setting, it is possible to process only new files added to the Input folder since the last batch. Without this option selected, all files in the folder are processed in every batch.
Split Multi-Page Input Files[edit | edit source]
When processing multi-page input files, each file is treated as a single document with a single index value by default. Checking this option causes SimpleIndex to split multi-page files into single images that must be indexed individually.
Process Subfolders[edit | edit source]
All subfolders of the Input folder are processed automatically when this option is checked. Each folder is processed in its own batch until all folders have been processed. Not available when scanning.
This option is useful when integrating with network scanners that scan multiple documents to a single file. Another common scenario is when batches of documents are saved to a single PDF file but must be separated for searching.
==Remove Empty Subfolders After Processing ==
Automatically deletes empty folders after the files have been processed. Only applicable when the Process Subfolders option is selected.
Sort Files by Date Modified[edit | edit source]
Sort input files by modified date instead of name. Ensures that files are processed in the order they were created.
Sort Subfolders by Date Modified[edit | edit source]
Sort subfolders by modified date instead of name when processing subfolders. Ensures that subfolders are processed in the order that they are added to the input folder.
Recompress Images[edit | edit source]
Check this box to automatically recompress all imported images using the default compression settings. By default pages are only recompressed when they are converted from one format to another, such as PDF to TIFF.
Resample Images[edit | edit source]
Check this box to automatically resample all imported images using the PDF X and Y resolution setting. This is helpful to standardize image resolution for zone OCR on files that come from different sources like scanners, copiers and fax machines.
Max Files/Batch[edit | edit source]
This option determines the maximum number of image files that will be used to determine a batch. In Update (5.9.2.3) and Retrieval modes (5.9.2.4), this value should be set to prevent users from retrieving too many records at once, which can impact performance.
This feature is also useful when using SimpleIndex to index many files from a very large Input folder. Processing more than 1,000 pages in a single batch is not recommended.
Another common scenario is when batches of documents are scanned on a network scanner and saved to the Input folder as multipage files. Set Max files/batch to 1 and enable Split Multipage Input Files to process each file in its own batch.
Set to 0 (default) for unlimited.
Run Job until Input Folder is Empty[edit | edit source]
When running a job on a timer loop, this option will stop the timed processing once all files in the input folder have been processed. This is useful for processing very large folders in several smaller batches or for processing several multi-page files as individual batches.
Backup Folder[edit | edit source]
The Backup folder is used to store a copy of the original files before they are processed, as well as invalid files that cannot be processed and batches that have errors or were aborted by the user.
Backup All Input Files[edit | edit source]
When checked, all files are automatically copied to the Backup folder before they are processed. Subfolders are created automatically in the Backup folder using the Batch ID (the current date/time formatted as YYYY-MM-DD@HHMMSS).
File Types to Process[edit | edit source]
The File Types to Process interface has been enhanced in the wizard to allow you to select from a list of predefined document types and add all the associated file types at once. Individual file extensions can be added or removed from the list.
Type a file extension and click Add to add it to the list, or select an existing file extension from the list and click Remove to remove it from the list.
It is also possible to use a file mask (e.g. "a*.pdf" to capture PDF files that start with the letter "a"). Enter the mask manually and click Add to add it to the list.
TIF, JPG, GIF, and BMP images may be processed as images. PDF, DOC, XLS, PPT, and other files may be processed and viewed in SimpleIndex if the appropriate software is installed on the computer. Any OLE-enabled application may be processed with SimpleIndex as long as its viewer is installed. Non-OLE file types may be opened automatically in their default viewer.
It is also possible to use advanced options using the Input file types or mask option on the Job Options screen.
Image Enhancement[edit | edit source]
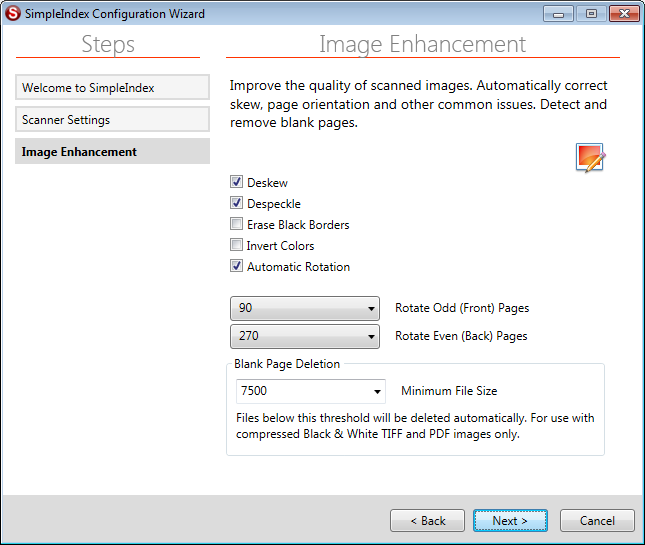
Use these options to improve the quality of imported images by automatically rotating them to the correct orientation, deleting blank pages or performing various image clean-up operations.
Deskew[edit | edit source]
Straightens the page, correcting any skew that might have occurred during scanning.
Despeckle[edit | edit source]
Cleans the image, removing stray pixels and marks. The enhanced despeckle included with the Full version will also remove shaded backgrounds from images.
Erase Black Borders[edit | edit source]
Removes black borders around the edge of the page that some scanners produce. Only works with black and white TIFF images.
Auto-Rotate[edit | edit source]
Checking this option will cause SimpleIndex to attempt to detect the proper page orientation and rotate the image automatically to this position.
This option only works with black and white TIFF images.
Automatic rotation uses a “best guess” algorithm to determine the page layout. This works very well with text documents, but accuracy decreases the more tables, handwriting, and pictures you have on the page. It should not be expected to work 100% of the time.
Invert Colors[edit | edit source]
Reverse the colors in the image automatically. This will switch Black with White on B&W images, or create a “negative” image for color.
Rotate Odd (Front) Pages[edit | edit source]
Rotates odd pages the selected number of degrees clockwise. Separate values for even and odd pages allow front and back pages to be rotated independently.
Rotate Even (Back) Pages[edit | edit source]
Rotates even pages the selected number of degrees clockwise. Separate values for even and odd pages allow front and back pages to be rotated independently.
Minimum File Size[edit | edit source]
Set this option to automatically delete blank pages by removing any files smaller than the value specified here (in Bytes). A good setting for this value (with 200dpi, B&W images) is 2000, but this can be adjusted to meet the specifics of your scanning environment.
This option is good for scanning mixed batches of single and double-sided pages and removing the blanks automatically.
A value for this field is required for the blank page Autonumber and OCR features to work.
PDF Import Settings[edit | edit source]
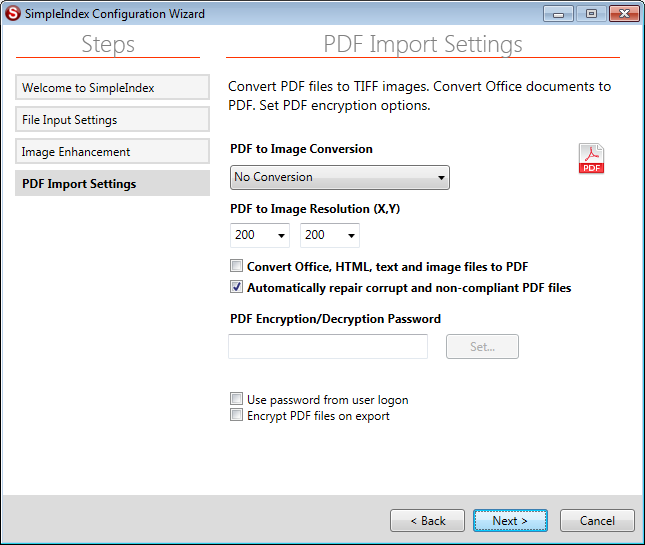
The PDF import options determine how PDF files will be converted on input or whenever it must be rasterized for OCR, OMR and barcode recognition.
PDF to Image Conversion[edit | edit source]
In order to perform some operations on PDF files, they must first be converted to TIFF images. SimpleIndex will automatically convert PDF to TIFF for OMR and barcode recognition on-the-fly. If you are upgrading from an earlier version of SimpleIndex you no longer need to use this option for most job configurations.
For image-only PDFs, it is much faster to have the embedded images “extracted” from the PDF. The TIFF images can be converted back to PDF without loss of quality or data by setting the Image File Type option to PDF.
Select Convert to TIFF (Detect Color) to automatically detect color versus black and white images and save them accordingly. Use Convert to B&W or Convert to Color to convert all pages to one format or the other.
PDF Resolution (X,Y)[edit | edit source]
When converting PDF to TIFF, these settings indicate the output resolution of the TIFF image. The first indicates the X or horizontal DPI (dots per inch) setting. The second indicates the Y or vertical DPI.
When saving embedded images from a PDF file, a default resolution of 200dpi is assumed for images found in the PDF files. Use these settings to override the X and Y resolution settings when extracting PDF images. If these settings do not match the originals, output images will show incorrect page dimensions.
Convert Files to PDF[edit | edit source]
Converts all MS Office, HTML, XML, text, and image files in the Input folder to PDF before processing. Files are converted and saved in the Input folder before the import step. If Keep Input Files is unchecked, the original files are deleted following conversion. To avoid having both copies of a file imported after conversion, use the Input File Types option.
This option requires MS Office 2003 or above or OpenOffice 3 or above to work. OpenOffice is available for free at OpenOffice.org.
Automatically repair corrupt and non-compliant PDF files is a new option in version 8 and is enabled by default. This prevents most errors during batch processing whenever non-standard PDF files cannot be read. There are thousands of applications that generate PDF files and many of these do not fully conform to the PDF standard. The repair function corrects the internal PDF structures allowing the images and text to be processed. However, in rare cases this can result in the loss of graphic elements like form fields or annotations.
Encryption/Decryption Password[edit | edit source]
Use the following options when importing or exporting password-protected PDF files.
Password[edit | edit source]
The password entered here is used to decrypt password-protected PDF files when importing and processing. The password will also be used to encrypt PDF files on export, if that option is select.
Use Password from User Login[edit | edit source]
When working with PDF files that have different passwords, this option is useful as it allows the user to enter a password when signing on to SimpleIndex and have that password used for that session. All files processed in a single batch must have the same password, but this option allows you to quickly change the password between batches without having to edit the job options.
Encrypt PDF on Export[edit | edit source]
All PDF files are encrypted with the current password when the batch is exported.
File Output Settings[edit | edit source]
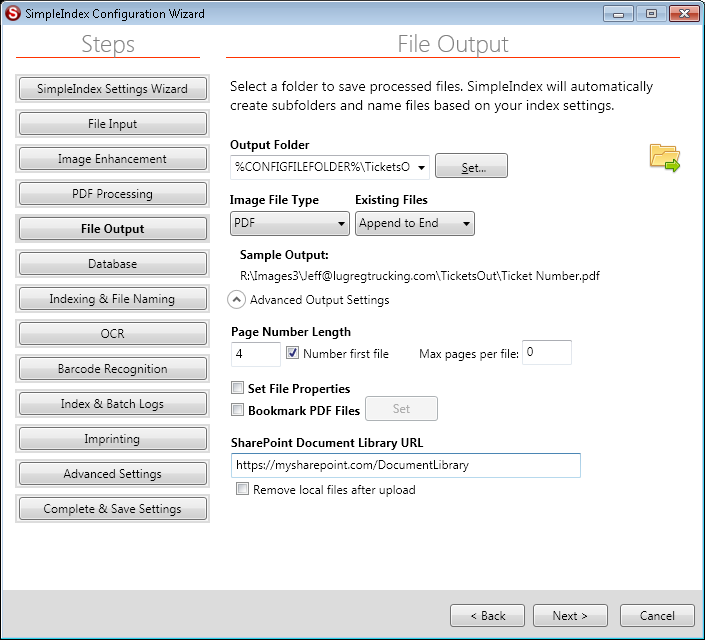
These settings determine the location and file format for exported files.
Output Folder[edit | edit source]
After processing, the images are moved or copied to the Output folder and the appropriate subfolders are created.
Image File Type[edit | edit source]
Select the file type you would like images to be saved in, either TIFF (default), PDF, PDF/A, or JPEG. JPEG does not support multi-page files. Non-image files are saved in their original format and are not affected by this setting.
Existing Files[edit | edit source]
When a file exists in the output folder, there are several options for how this is handled by SimpleIndex. The Append options apply only to multi-page TIFF and PDF files. All other file types are named according to the settings described under Numbered 1-Page Files, unless Replace Existing Files is selected, in which case existing files are overwritten.
Numbered 1-Page Files[edit | edit source]
Using this option, only single-page files are created, and the page number is added to the filename for any subsequent pages with the same output filename. Use the File/page number length, Number first file, and Field Separator settings to format the file numbering scheme.
Here are 2 sample settings for the page numbering and the resulting filenames (assuming TIF images):
File/page number length: 4 Number first file: On Field separator: -
Page 1: Filename-0001.tif Page 2: Filename-0002.tif Page 3: Filename-0003.tif
File/page number length: 6 Number first file: Off Field separator: =
Page 1: Filename.tif Page 2: Filename=000002.tif Page 3: Filename=000003.tif
Typically, you would turn Number first file off when you expect most files to have only 1 page and only need to account for the occasional duplicate.
Append to End[edit | edit source]
Use this setting to add new pages to the end of existing files. These are added in the order they appear in the batch. This is the default setting for creating multi-page files from individual pages in a batch.
Append to Start[edit | edit source]
Use this setting to add pages to the beginning of existing file. If a batch has multiple files with the same output filename, these pages will appear in the same order they appear in the batch.
Replace Existing Files[edit | edit source]
This setting will replace any existing files with the file from the current batch. The user is not prompted—the file is overwritten automatically. If multiple TIFF or PDF files from a batch have the same filename, they are combined into a multi-page file before overwriting the existing file.
File/Page Number Length[edit | edit source]
Use this setting to change the number of leading zeros in the file numbering scheme.
This setting is used with the Numbered 1-Page Files option and with any file that is not a TIFF or PDF.
Number First File[edit | edit source]
When scanning single-page documents, the -0001 after each file is usually unwanted. Uncheck this option to disable the number on this first page.
This setting is used with the Numbered 1-Page Files option and with any file that is not a TIFF or PDF. It is also used to generate temporary filenames in the processing folder.
Max Pages Per File[edit | edit source]
This option allows you to set a fixed number of pages for each file. This can be used to automatically split files that have a fixed number of pages or to break up very large files into several smaller ones.
When used with the Forward option, this setting limits the number of files that index values are carried forward for. For example, a setting of 2 would allow you to read index information from the front page of a document, have it automatically apply to the back page, but not to the following page.
This option may also be used with Autonumber fields to automatically increment the number every X pages.
Set File Properties on Export[edit | edit source]
TIFF, JPEG, PDF, and MS Office documents have various properties that can be indexed and searched by various engines like Google Desktop, Microsoft SharePoint, and Search Server. SimpleIndex is able to update these property values using the data from your index fields.
The following properties can be set with any type of file:
- Title
- Author
- Subject
- Keywords
- Comments
To save the values for a particular field to one of these properties, enter the property name as it appears above in the Name setting for the corresponding field.
Enabling this option will increase the time it takes to export batches, in some cases significantly.
PDF files also have a Producer tag that can be set in addition to the above properties.
There are several property tags (called EXIF tags) specific to TIFF and JPEG images that can be set as well. These are:
- ImageDescription
- Artist
- Copyright
- DateTime
- DocumentName
- EquipMake
- EquipModel
- HostComputer
- ImageTitle
- InkNames
- PageName
- SoftwareUsed
- UserComment
SimpleIndex has the capability to read and write any EXIF property tag, including non-standard and custom tags. Please contact support if there are any EXIF tags not listed here that are required by your application.
For a complete list of EXIF tags and their expected data types, see: http://msdn.microsoft.com/en-us/library/ms534416
Add Bookmarks to PDF Files[edit | edit source]
SimpleIndex has the ability to automatically add bookmarks to multi-page PDF files based on the index field values of the pages within it. Nested, multi-level bookmarks can be created in the same way that subfolders are created using the Folder option.
These settings can be used to create a PDF file with the bookmark structure shown on the right.