Global Settings Wizard
The first time you run SimpleIndex, the Global Settings Wizard is displayed.
From this wizard you can download configurations from a website, set default configuration folders and security options.
Administrator privileges are required to run the Global Settings Wizard since it configures shared settings for all users on the computer.
The default settings under the Basic configuration are appropriate for most users unless you need OCR and indexing in non-European languages, or wish to prevent users from editing Job Settings.
Setup Type Selection[edit | edit source]
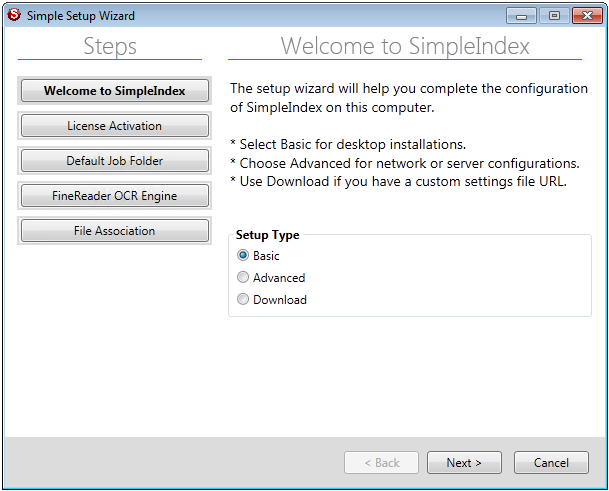
The Basic option is sufficient for most users.
Use Advanced if you need one of the following:
- Server processing options
- Password-protect job settings
- Redaction options
- Prevent users from saving/emailing files
The Download option is available to automatically download and configure job settings and supporting files. This download must be configured by our Tech Support team.
License Activation[edit | edit source]
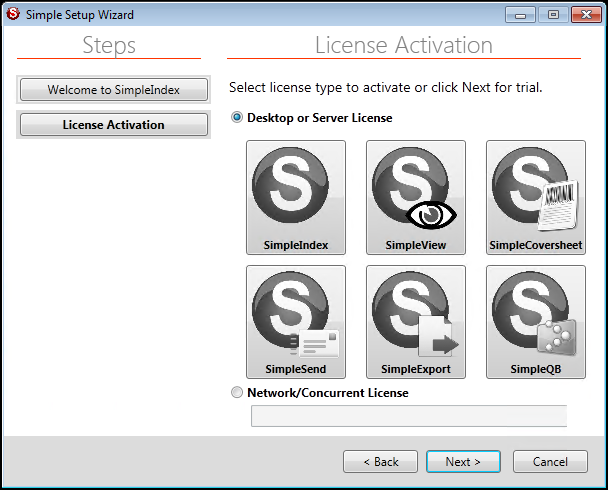
The License Activation screen is always displayed after the Setup Type selection. This screen has a button for each application in the SimpleIndex document management suite. The button will be gray when the application is not activated or installed. The buttons will show in color for each application that is currently activated.
If you have a Concurrent license, enter the serial number in the Network/Concurrent License Serial.
Workstation licenses are activated by clicking the button for the corresponding application.
Default Job Folder[edit | edit source]
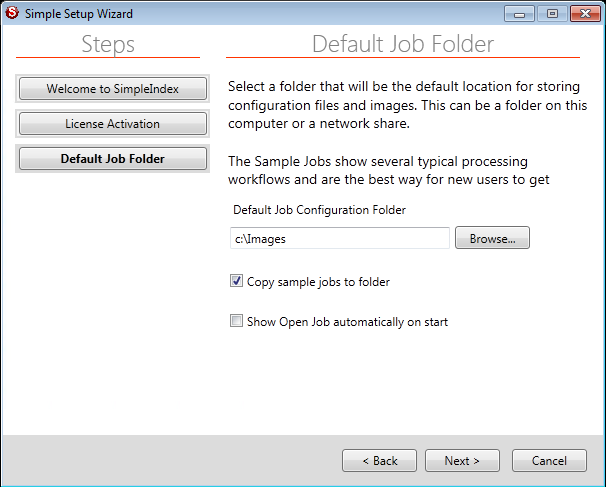
This screen is shown in the Basic and Advanced wizards.
Default Job Configuration Folder[edit | edit source]
This folder is shown automatically any time you open or save a configuration. It is recommended you put all of your job configuration files, lists, and other files required by your jobs in this folder or in subfolders of this folder.
Copy Sample Jobs to Config folder[edit | edit source]
Selecting this option will copy several sample job files, complete with sample images, list files and databases, to your default Config folder under a folder called Samples. These jobs demonstrate many of the core features of SimpleIndex.
Many of the samples are numbered to indicate that they should be run in a specific order, since the processing done in Step 1 provides the documents that are searched in Step 2.
Show Open Config when SimpleIndex starts[edit | edit source]
Select this option to display the Open dialog automatically when you run SimpleIndex. This lets you quickly select a job file to run, saving you the extra step of having to click the Open button.
Default Data Folders[edit | edit source]
This screen is only shown when you select the Advanced setup type.
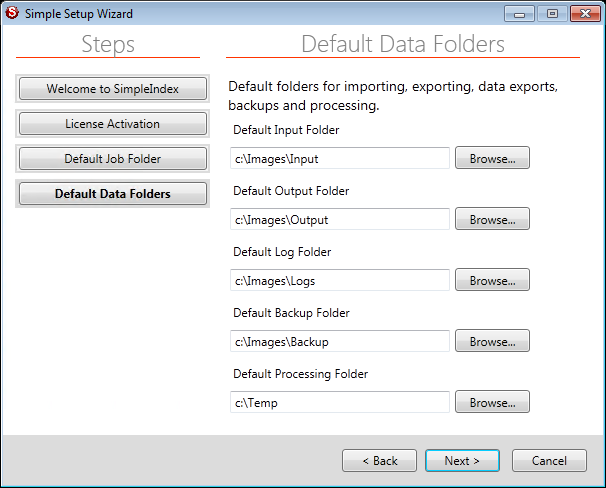
The default folder settings are used when creating new SimpleIndex configurations. They allow you to create job files that work on computers with different folder structures and to move configurations and image files without having to update multiple job files.
In any of the settings that use a file path you may use special keywords like %DEFAULTINPUT% in place of the actual path.
The following pre-defined folders are set here:
- Config – folder for storing configuration files %DEFAULTCONFIG%
- Input – source for processing files %DEFAULTINPUT% ()
- Output – folder for exported images %DEFAULTOUTPUT%
- Log – folder for index and batch logs %DEFAULTLOG%
- Backup – folder for files with invalid formats, aborted batches and backups of input files %DEFAULTBACKUP%
- Temp –folder for files currently being processed. The default is c:\Temp to allow easier administrative access to this folder and for permissions inheritance. Server users should use %USERTEMP% to store files under their user profile, which prevents multiple users from accessing the same Temp folder simultaneously.
In any folder or file path setting you can indicate the path to the configuration file with %CONFIGFILEFOLDER%. This is the recommended best practice for creating relative paths, since job configurations and supporting files can be moved or sent without having to update hard coded paths.
Security Settings[edit | edit source]
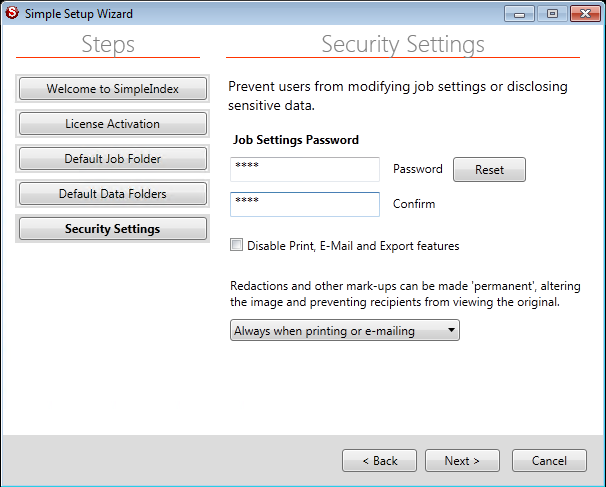
Part of the Advanced settings. Prevent users from accessing job options or disclosing private or confidential information to third parties.
Admin Password[edit | edit source]
Set this option to force the user to login with this password before accessing the configuration settings. This prevents users from accidentally changing configuration options.
Use the Reset button to remove a previously set password.
Disable Print, E-Mail, and Export features[edit | edit source]
Check this option to disable features that allow users to reproduce documents outside of SimpleIndex. Use this for extra security and access control.
Annotation Privacy Settings[edit | edit source]
This option lets you select when to “burn in” annotations automatically, which makes the annotation a permanent part of the image and prevents users from viewing the data underneath. This is typically used for redaction of private information. Options are to always make annotations permanent, only when printing or emailing documents, or never.
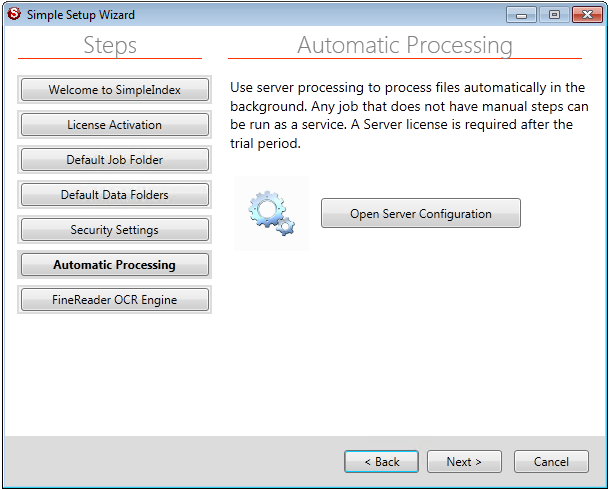
Automatic Processing[edit | edit source]
This screen lets you access the Configure SimpleIndex Service options to setup the unattended server processing settings. Click the Open Server Configuration button to display the server settings screen.
FineReader OCR Engine[edit | edit source]
The FineReader OCR Engine is required to perform character recognition functions. It is not required if you only plan to use scanning, manual indexing, and/or barcode recognition features only. It is downloaded and installed separately here to make the download smaller and to streamline the process for non-OCR users.
This page is displayed if you select Advanced setup type, or in the Basic wizard if you have not previously installed FineReader.
FineReader OCR Engine[edit | edit source]
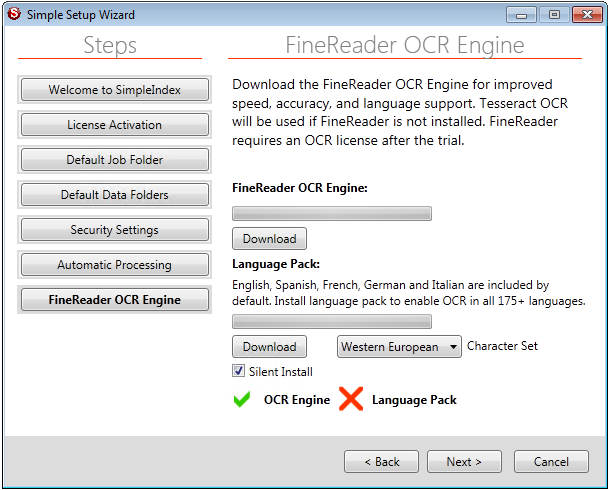
Click the Download button under this option to download and install the core FineReader OCR components, as well as the most common western European language dictionaries (English, Spanish, French, Italian, German, and Dutch).
Language Pack[edit | edit source]
Install the language pack for both OCR engines only if you require OCR in languages other than the ones listed above. When installing languages for FineReader, the FineReader Engine must be installed first.
Silent Install[edit | edit source]
Uncheck this option if you experience any issues with the automatic download and installation process. This will allow you to install the applications interactively.
Character Set[edit | edit source]
The Western European (default) character set supports all of the default OCR languages and outputs index data in ASCII format. Select an alternative character set to support Unicode indexing in languages like Greek, Cyrillic, Chinese or Arabic.
File Association[edit | edit source]
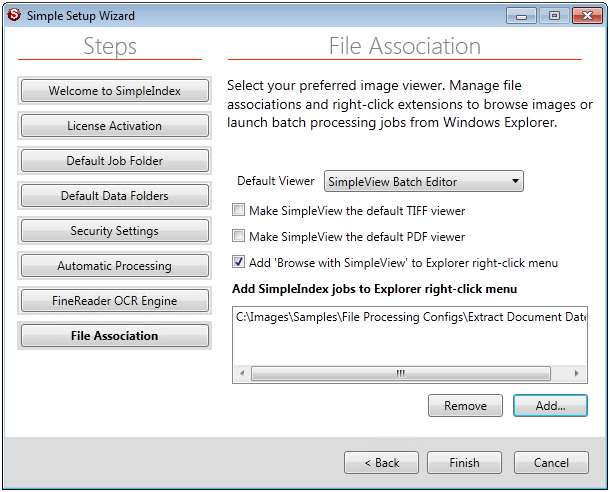
This screen is the final screen shown in the Basic and Advanced wizards. Use it to change the default viewer for TIFF or PDF files to SimpleView, add SimpleView to the right-click menu in Windows Explorer, or add SimpleIndex job files to the Explorer right-click menu.
Default Viewer[edit | edit source]
If you prefer to use a third party PDF viewer you can select External PDF Application here. Each new job configuration will use the default viewer, but this option can be changed and saved with the job file from the SimpleIndex View menu.
Open TIFF files with SimpleView[edit | edit source]
Use this to change the default file association for TIFF images to SimpleView. Double-clicking a TIFF file will open that file in SimpleView instead of any other program, such as Windows Picture & Fax Viewer.
Open PDF files with SimpleView[edit | edit source]
Use this to change the default file association for PDF images to SimpleView. Double-clicking a PDF file will open that file in SimpleView instead of any other program, such as Adobe Acrobat Reader.
[edit | edit source]
Check this box to integrate SimpleView with the Windows Explorer right-click menu for folders. Right-clicking on any folder will display a new "Browse with SimpleView" option in the context menu. Selecting this option will open a new instance of SimpleView with the selected folder displayed.
[edit | edit source]
You can add any SimpleIndex job file to the Explorer right-click context menu. Right-clicking on any folder will display a new option in the context menu with the job file name. Clicking that option will execute the job file using the selected folder as the Input folder.
This lets you perform ad-hoc processing on any folder without having to configure the job options. For example you can create a job called "Convert All Files to PDF" that simply converts all the files in a folder to PDF, preserving the existing filenames. Add this job to the right-click menu and you can convert the files in any folder to PDF with a simple right-click.
Download Automatic Configuration[edit | edit source]
This option allows administrators to bundle several configuration files, supporting documents and data files together, and download them automatically when installing SimpleIndex.
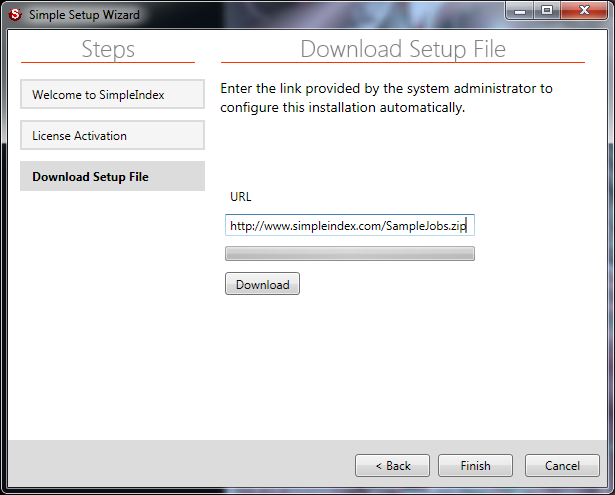
The user only has to enter a URL configured by the administrator and click the Download button. Once the download completes, the required files are installed automatically; the user simply clicks Finish to complete the wizard.
The download is a zip archive file containing all of the files you wish to install on the computer. The zip file can also contain a batch file called “Config.bat”, “Config.exe”, or “Config.vbs” that is launched automatically if present. This file can perform a wide variety of tasks:
- Automatically set all default folders and security options via the registry
- Copy list files, databases and other supporting files to default locations
- Download and install scanner drivers
- Install other supporting applications like image conversion tools
Registry Keys set by the Global Settings Wizard are below. Options set by check boxes are “1” or “0”; other settings are the full path to a folder.
“HKLM” is short for “HKEY_LOCAL_MACHINE”
HKLM\Software\SimpleIndex\DefaultFolders\Config HKLM\Software\SimpleIndex\DefaultFolders\Input HKLM\Software\SimpleIndex\DefaultFolders\Output HKLM\Software\SimpleIndex\DefaultFolders\Log HKLM\Software\SimpleIndex\DefaultFolders\Backup HKLM\Software\SimpleIndex\DefaultFolders\ShowOpen HKLM\Software\SimpleIndex\Security\AdminPW HKLM\Software\SimpleIndex\Security\DisableSend HKLM\Software\SimpleIndex\Security\MakePermanent
Demo/Registration Screen[edit | edit source]
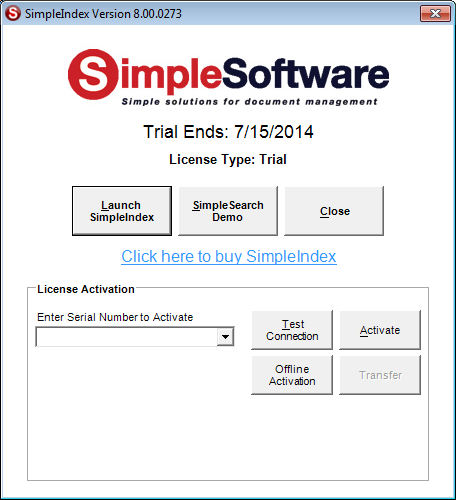
When SimpleIndex is first installed, it is automatically set to run in Demo Mode, with the expiration date set to 30 days after you first run the program. Demo Mode can run as SimpleIndex Full with all optional features enabled, or it can emulate the SimpleSearch view-only. You must restart SimpleIndex to switch between modes.
Starting in Demo Mode[edit | edit source]
To start SimpleIndex in demo mode, click Launch SimpleIndex. Click SimpleSearch Demo to emulate a search-only license. Close will exit the application.
License Activation[edit | edit source]
To register SimpleIndex, enter your serial number in the box and click Activate. If you are connected to the Internet, and no firewall is blocking it, SimpleIndex will connect to the activation server and register automatically.
If connectivity problems prevent communication with the activation server, you may activate offline by clicking the Offline Activation button and following the on-screen instructions.