Licensing & Activation
This section outlines some of the key components to a document scanning and indexing workflow and how SimpleIndex implements them. The actual settings screens will be easier to understand once the underlying concepts are explained.
Demo/Registration Screen[edit | edit source]
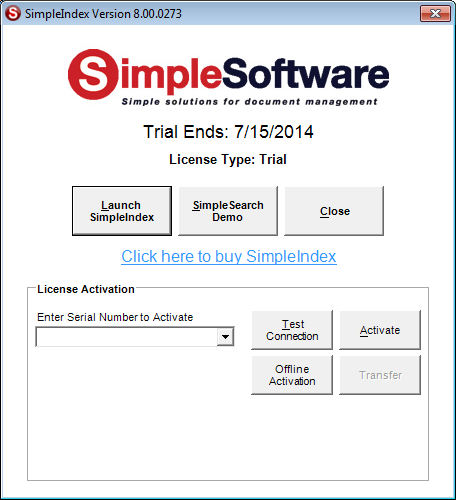
When SimpleIndex is first installed, it is automatically set to run in Demo Mode, with the expiration date set to 30 days after you first run the program. Demo Mode can run as SimpleIndex Full with all optional features enabled, or it can emulate the SimpleSearch view-only. You must restart SimpleIndex to switch between modes.
Starting in Demo Mode[edit | edit source]
To start SimpleIndex in demo mode, click Launch SimpleIndex. Click SimpleSearch Demo to emulate a search-only license. Close will exit the application.
License Activation[edit | edit source]
To register SimpleIndex, enter your serial number in the box and click Activate. If you are connected to the Internet, and no firewall is blocking it, SimpleIndex will connect to the activation server and register automatically.
If connectivity problems prevent communication with the activation server, you may activate offline by clicking the Offline Activation button and following the on-screen instructions.
Processing Stages[edit | edit source]
SimpleIndex is designed to process documents in the following stages, starting when the user clicks the Run Job button.
- Import images from the Input folder or scan new images (5.3.2)
- Process images, performing PDF Processing, Auto-rotate, OCR, Barcode Recognition, Despeckle and Deskew.
- Manually review images and index values from OCR and Barcode Recognition. Manually enter index values that are not populated automatically.
- Audit the batch (optional) to ensure all required documents are present and all index information is entered correctly.
- Export the images and index information to the Output folder. Subfolders and filenames are determined by the index options you select.
If enabled, Insert mode will create records in your database and populate them with the index values from this batch.
Index, batch, and audit log files are written to the Log folder and log files/database records are created.
SimpleIndex is unique because it performs all the enabled stages sequentially without user intervention. Other programs require a separate command to initiate each step, slowing productivity in single-workstation environments. When you click the Run Job button, SimpleIndex scans, processes, and exports the images automatically according to your configuration settings.
An even greater degree of automation can be achieved if all of the index values can be automated through Barcodes, OCR, or the Command Line Interface. Using Pre-Indexed batches, you can skip step 3 and perform scanning, processing, and export without any user intervention whatsoever. This allows you to run SimpleIndex by just double-clicking the job file, or by launching it from another program.
When configuring SimpleIndex, keep these stages in mind and think about what your particular job requires at each step. This will help you make sense of the many options available to you.
File Naming Schemes[edit | edit source]
SimpleIndex’s file naming parameters allow you to organize scanned documents logically using folders and filenames, making it easy for users to find the file they need using Windows Explorer. File naming conventions also allow you to link images to existing database records by assuming images are saved with a specific folder and filename, eliminating the need for data imports.
File naming conventions are how SimpleIndex combines pages in a multi-page document into a single file. If you are used to other document management applications, this may be a different way of doing things. SimpleIndex considers any set of images that have the same index values a single document. At the end of the job, the export file is determined by the index values, and matching images are combined into one multi-page file. This simplifies the indexing process and makes it possible for pages in a single document to occur non-consecutively in a batch. This also makes it possible to append pages to previously scanned documents at a later date.
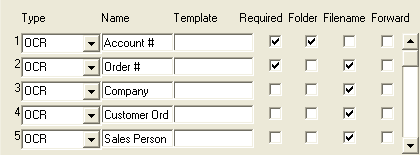
Each index field you define has the option to be used as a folder level or filename. When exporting, SimpleIndex goes through the index fields in order, creating folders for each field where Folder is checked, and creating the filename by linking the index values that have Filename checked. For the pictured example, if the Output folder is “c:\output” and the Field Separator is “-“ the files would be named:
C:\output\Account #\Order #-Company-Customer Order #-Sales Person.tif
Linking Jobs[edit | edit source]
Many scanning tasks are better performed in separate stages. For example, a large scanning operation may need several scanners and indexers working together. This can be accomplished by configuring the scanners to scan images to an intermediate folder, from which the indexers would then pull files, index them, and produce the final output. Using this technique, a wide variety of imaging tasks can be accomplished.
The database features are also useful in linking jobs. Insert mode can be used by scanning workstations to create new records, and Update mode can be used by unattended barcode/OCR processes and by indexers to review and correct the index information.
Finally, the Pre-Process and Post-Process options allow you to run any program from a command line automatically at the beginning or end of each batch. This is perfect for converting input files or performing post-processes on the output files to transform them to any format you need. You can also use it to initiate a database import or FTP upload. Since you may launch any application, there is no limit to the possibilities.
Starting the Settings Wizard[edit | edit source]
Select New Job Configuration from the File menu, or click the New Job icon to start the wizard for a new job configuration.
To edit an existing job configuration in the wizard, select Job Settings Wizard from the File menu, or click the Wizard button on the Job Options screen.
Welcome Screen[edit | edit source]
Wizard Mode[edit | edit source]
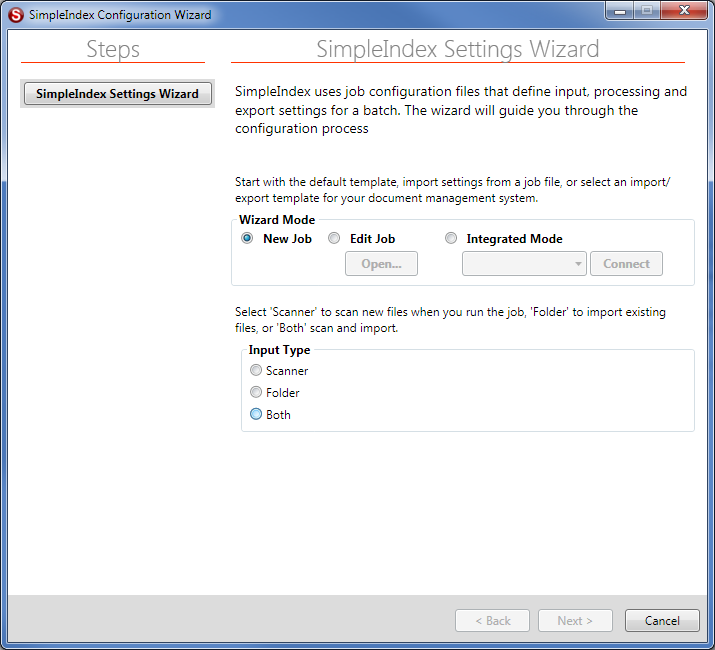
Select New Job to create a new, blank job configuration with the default settings.
Select Edit Job to open a job file for editing.
Use Integrated Mode to import index field settings from your document management system and automatically specify an export format. Settings import modules are customized for each DMS and are not installed by default. Contact support (0) to request an import module for your DMS.
Input Type[edit | edit source]
The steps required by the wizard depend on whether new files are scanned as part of the job workflow or existing files are imported from a folder. Select Scanner or Folder to indicate which type of job workflow to use. Select Both to process new scans and existing files in the same batch.
Several settings allow you to use the job configuration file name and folder as variables. Once the Input Type is selected you will be prompted to save the configuration file before continuing.
Scanner Settings[edit | edit source]
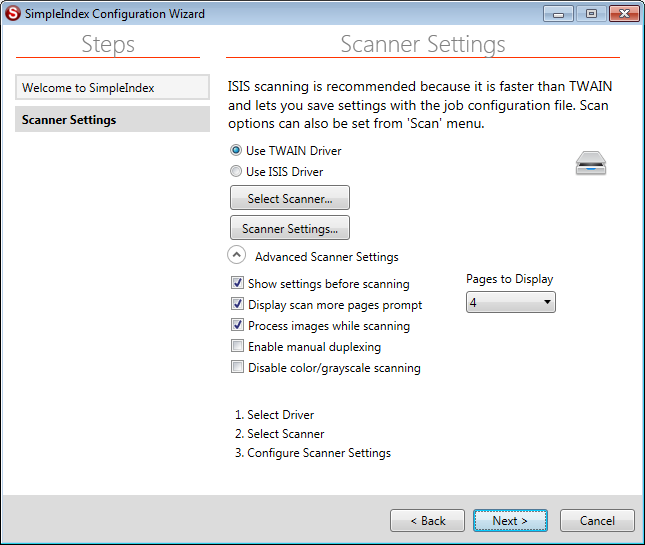
If Scanner was selected as the input type, the next screen is the Scanner Settings. Scanner settings are not available in the Job Options screen, since many of them need to be modified by the user during batch scanning. The corresponding settings can be found under the Scan menu, allowing users without the Admin password to change them.
TWAIN or ISIS Driver[edit | edit source]
TWAIN scanning is included with all versions of SimpleIndex. ISIS scanning is included in the Pro version or as an add-on to Standard. ISIS scanning is faster, especially on older computers, and lets you save the scanner settings to the job configuration file. This gives the administrator full control over the scanner settings so users don't have to change the scanner settings manually for different types of documents.
Advanced Scanner Settings[edit | edit source]
The Advanced Scanner Settings can be set from the Scan menu and full descriptions can be found in section. However there are two options that are not available from the Scan menu.
- Process images while scanning - perform image enhancement and barcode recognition in real time while scanning instead of in a separate processing stage. This means users don't have to wait for image processing to complete before the batch can be indexed or exported.
- Disable color/grayscale scanning - forces all images to be scanned in Black & White regardless of what settings are chosen in the TWAIN or ISIS driver interface.
Display Settings Before Scan[edit | edit source]
When this menu option is checked, the scanner settings dialog is automatically displayed before each new scan.
Display Scan More Prompt[edit | edit source]
This checkable menu item causes SimpleIndex to ask the user if s/he wants to scan more pages into the current batch. This helps if the scanner’s hopper is not big enough for all the pages, or if a jam interrupts scanning before the batch is complete.
Pages to Display[edit | edit source]
When scanning in ISIS mode, multiple pages can be displayed on the screen at once (up to 9). This option is not available in TWAIN mode. This is useful for viewing both sides of a duplex scan or multiple image streams at once.
Enable Manual Duplexing[edit | edit source]
Check this box to scan 2-sided documents on a simplex scanner. When scanning you will be prompted to scan the front side of the documents, flip the pages, and then scan the reverse side. The batch will contain both sides of each page in the correct order.
File Input Settings[edit | edit source]
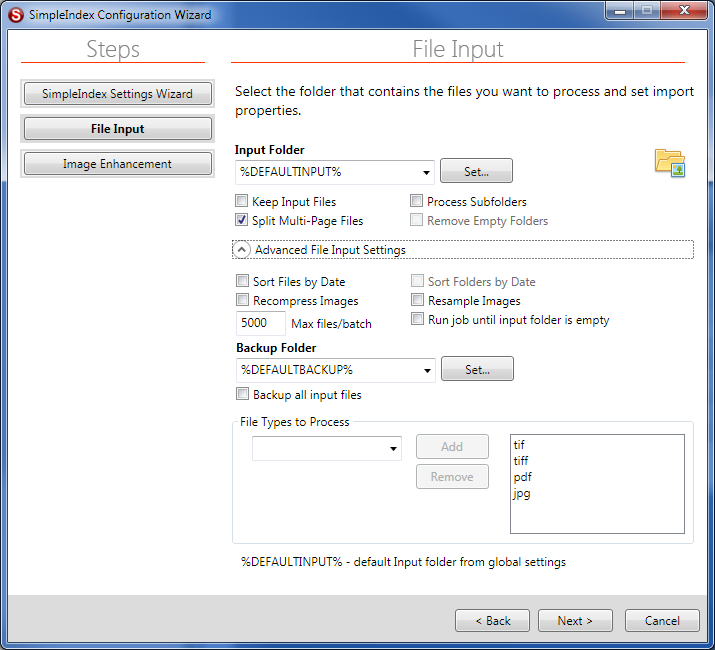
The File Input Settings screen is displayed when Folder is selected as the input type. These settings determine which files are imported, and what order they are processed.