Database

The Database page lets you configure a database to export index data and images. You can also use a database to search and view existing files.
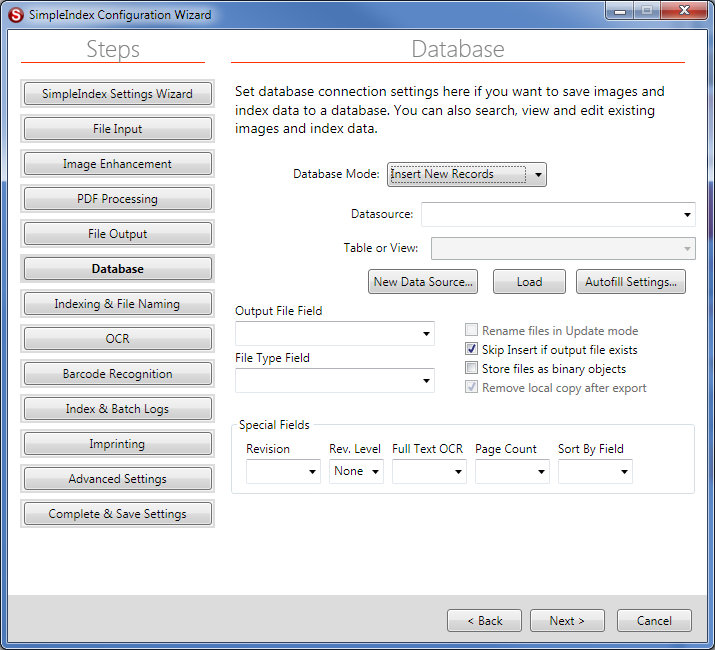
Configuration of the database settings is similar to the Job Options screen. Index field mappings have been moved to the index field wizard. Use this screen to configure the data source connection, target table and special fields.
Database Design Overview[edit | edit source]
This overview will help you understand the overall database configuration scheme. The sections that follow give detailed descriptions of how to configure each setting on the database page.
The database interface with SimpleIndex was designed to provide low-level interaction with any database to provide a wide variety of new functionality for a multi-user environment. Most document capture software comes with its own internal database that is used to manage scanned batches and index values until they are exported to an intermediate format that is finally imported into your database. SimpleIndex exports index data directly to fields in your database, thus bypassing the intermediate stages and giving you instant access to new images. This also allows SimpleIndex to work directly with custom database programs without any custom programming.
SimpleIndex’s database interface provides this functionality by operating in four “modes”: Insert New Records, Update Existing Records, Retrieve and View Records, and Match and Attach.
- When images are scanned, records must be “inserted” into the database to store the image file location and pre-indexed data.
- Manual indexing is done by retrieving a batch of records on another workstation and “updating” them with the correct index data.
- Users may view scanned images by “retrieving” them from the database based on index criteria and viewing the matching documents.
- Existing database records can be updated in batches, linking files and updating index fields automatically.
Processing stages can be tracked using the Revision Level field. This field keeps track of how many times a document has been processed (scanning, indexing, double-key verification, QC review, etc.) as well as who is currently working on a document.
SimpleIndex assumes the database is configured to have a single table or query that contains all the index fields and a field to link the image using the full or relative path to the image file. Optionally, this table can include fields for the batch ID, page count, and full-text OCR. You may also store batch log information in a separate table for productivity tracking.
Database Mode[edit | edit source]
Disabled[edit | edit source]
Select this option to disable the database interface.
Insert New Records[edit | edit source]
Insert mode causes SimpleIndex to insert new records into a database that correspond to the index values for your scanned images. This option lets you populate the document database with new records for files processed by SimpleIndex. The files in this database can then be searched and viewed with Retrieval mode or edited with Update mode.
Update Existing Records[edit | edit source]
Update mode configures SimpleIndex to retrieve existing images and index information from the database and display it to the user. The index data can be reviewed and modified, and images can be added, modified or rescanned if necessary. The Update feature can also be used to automatically create folder hierarchies and give meaningful filenames to images while preserving their link with the database records.
There are several useful applications of the update feature of SimpleIndex:
- Quality control review & rescanning
- Verification of index values
- Unattended processing
- Distribute indexing among multiple users
- Automatically rename existing image files using index values
- Search tool to find and view specific images
Retrieve and View Records[edit | edit source]
Retrieval mode lets you find documents with keyword searches and view the matching files. Retrieval mode is used interchangeably with SimpleSearch. SimpleSearch is a retrieval-only license for SimpleIndex that allows only Retrieval mode configurations to be run.
In Retrieval mode, the index fields on the main screen become search fields, and the Save Index and Save All buttons become Search and Clear. To find documents, type the search criteria into the index fields and click the Search button. Use Clear to start a new search.
See (7.1) for more information on searching and viewing documents in Retrieval mode.
Match and Attach Records[edit | edit source]
Match and Attach mode lets you associate scanned images with existing records in the database without recreating them or updating them one-at-a-time. To use this mode, select a key field using the Autofill settings. This key field is used to lookup matching records in your database. When a batch is exported, a lookup is performed for each file. The matching record for that file is updated with the image file path and other data entered into SimpleIndex fields, leaving the rest of the data in the table intact.
This is the quickest method for image-enabling an existing database application. All you need to do is first add a field for the image file, then configure the Match and Attach configuration that indexes documents based on the primary key and fills in this field automatically.
A new data source configuration wizard has been added to simplify the process of connecting to various databases. Click the New Data Source... button to start the wizard.
Table or View[edit | edit source]
SimpleIndex is designed to store index information and the path to the image files in a single table or query. Select a table or query that will store this information here.
To use SimpleIndex in Insert Mode, the table or query must have a primary key that is generated automatically (Autonumber, GUID, etc.).
Use the Load button after you have entered the name of your table to load the field selectors with a list of the available fields from that table.
It is possible to use a query (also called a view) that allows you to store index information and image data in separate tables. Depending on the database type, there are constraints on the field relationships necessary to create a query that supports inserting and updating. Please ensure your query is updatable before using it with SimpleIndex. Consult your database documentation for more information on creating updateable queries.
Output File Field[edit | edit source]
The Output File Field is used to store the path to the image file corresponding to the current record.
It is recommended that you use the relative path instead of the full path to store the image filename. Doing this allows you to move the images to another storage server without having to perform a complex update on this field to reflect the change.
Uncheck the Output full path to exported files option to store the relative path, leaving off the Output folder.
If the images move, you only need to enter the new path in the Input and Output folders of your SimpleIndex configuration files to make your document management system work in the new location.
File Type Field[edit | edit source]
This field stores the file extension for each file. It is designed to be used when storing files as binary objects to allow SimpleIndex to determine what type of file the data represents, so it can be displayed in the correct viewer.
Rename Files in Update Mode[edit | edit source]
This option will cause saved images in Update mode to be moved from the Input folder to the Output folder, and renamed using the subfolder and filename determined by the Index settings.
This makes it possible to do a variety of 2-stage indexing processes. Some examples are:
- Scan and create multi-page files with separator sheets, then index and rename those files with Update mode.
- Use scheduled OCR to automatically index fields and Update mode to correct OCR mistakes and move files to their destination
- Keep files in a temporary location during processing and move to a production server once indexing is complete
Skip Insert if output File Exists[edit | edit source]
When you scan using the same configuration with the same index values, images are appended to the existing files. In most cases, you do not want another record created in the database for the same file. Check this box to prevent these duplicate records from being created.
Store Files as Binary Objects[edit | edit source]
Check this option to store the file data in the database field defined in the Output File Field instead of the default behavior, which is to save the path to the external file in this field. This allows all data to be stored within the database server without the need for separate files on the network.
Use the File Type Field setting to indicate the file type for documents stored in the database. In Retrieval and Update modes, this is used to determine the proper viewer to display the file in.
Remove Local Copy After Export[edit | edit source]
Uncheck this option to keep a copy of the exported files in the Output folder after they have been saved to the database as a binary object.
Revision Field/Level[edit | edit source]
The Revision Field is used to indicate different queues that can be used for different types of processing. In Insert mode, the Revision Level value you enter is stored in the selected field. In Update mode, the user retrieves only images that match the selected Revision Level, and this value is incremented by 1 whenever the user saves an index value using the Save Index button.
By incrementing the value of the Revision Level, it is possible to tell which stage of processing each image is in. Typically, scanners will insert records with a Revision Level of 0. Indexers then update these records with the field information and increment the level to 1. Double-key indexers or QC reviewers finally update the level to 2, indicating that processing is complete. Database stored procedures may then be implemented to move records with a level of 2 to a table on a production server if necessary.
IMPORTANT! The Revision Field must be defined as a Character data type and not an Integer!
When used in Update mode, SimpleIndex “checks out” each batch to the current user by setting the Revision Field temporarily to the user’s ID, preventing the records from showing up in another user’s batches. For this reason, the Revision Field must be a multi-character data type with sufficient length to store the User ID.
Full Text OCR Field[edit | edit source]
If using Insert mode, this setting allows you to specify the name of a long text or memo field to use to store the full text OCR results. This will associate the image file and index information with the text of the document inside your database, making full text search possible.
Page Count Field[edit | edit source]
If using Insert mode, this setting allows you to specify the name of a number field to use to store the page count for each file.
Sort By Field[edit | edit source]
In Insert and Update modes, this field will be used to sort the search results.
Data Source Configuration Wizard[edit | edit source]

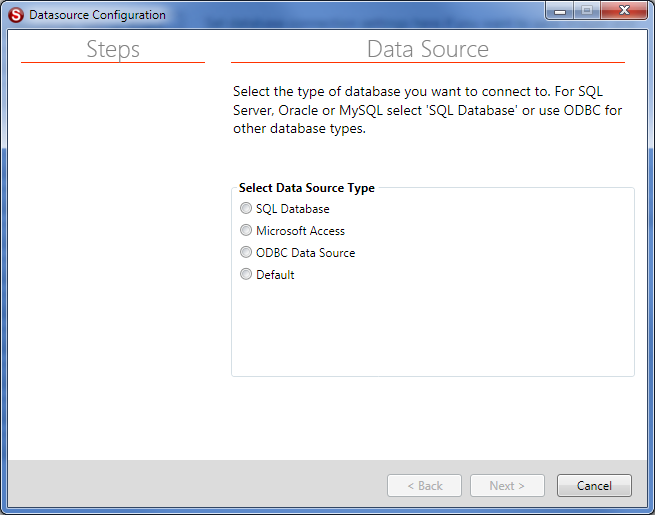
First select the type of data source to use. SQL databases like SQL Server, MySQL and Oracle can be configured by selecting SQL Database. You can also enter a custom connection string to connect to a variety of other database types.
For non-standard databases, including Excel files, text files and non-SQL databases, select ODBC Data Source to configure the connection using ODBC. Contact your database vendor to find out if an ODBC driver is available.
SQL Server[edit | edit source]

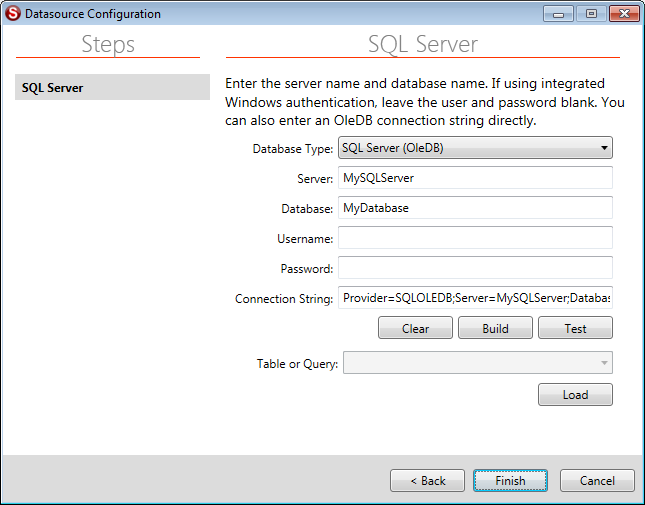
First select the database type. Options are available for SQL Server, Oracle and MySQL, with different driver options available depending on your environment. Selecting the database type also configures some advanced database settings automatically based on your selection.
Next type the server name. This is usually a computer network name, but may include the instance name (e.g. MySQLServer\SQLExpress).
Enter the database name as it appears in your database manager.
If your database supports integrated Windows authentication, you should leave the Username and Password fields blank. The database connection will be made using the logged on user's credentials. If SimpleIndex user logons are enabled, that username and password will be used to authenticate the database.
Click the Build button once the above fields have been filled in to generate the Connection String. You can then edit the connection string to add custom parameters. You can also skip all of the above steps and enter your connection string directly if you prefer.
Once the Connection String has been entered, a list of tables and queries will be displayed in the Table or Query drop-down. If it doesn't connect automatically, click Test to validate your database connection or Load to refresh the list of tables.
Once the target table has been selected click Finish to save the settings and exit the data source wizard.
On Windows 8 and newer operating systems, a newer version of SQL Server Native Client may be installed. Use SQLOLEDB or manually replace SQLNCLI10 with SQLNCLI11 (or whatever the current version is) in the connection string.
Access Database[edit | edit source]
To use a Microsoft Access database, click the Browse... button to select the database file you want to use. Once selected, the Table or Query list will be populated. Select what you want to use and click Finish.
The connection string for Access is simply the path to the database file. If the job file will be shared by multiple users, the path must be accessible from each computer. The easiest thing to do is to save the job configuration in the same folder as the Access file and use the %CONFIGFILEFOLDER% keyword to indicate the folder. This ensures the database reference will not break if different users use different network drive letters or if the files are moved to another folder.
ODBC DSN Data Source[edit | edit source]
To use an ODBC User or System data source, select it from the drop-down list.
Click ODBC to open the ODBC Data Source Manager and configure new data sources.
Use the Browse... button to select a file DSN.
Default[edit | edit source]
This wizard copies a pre-configured Access database to the folder you select and automatically configures all database options to use the defaults from this database. By using generic field names and types for all fields, SimpleIndex is able to connect any existing configuration with up to 25 index fields to a database, enabling the SimpleIndex multi-user scanning and retrieval options instantly.
The blank database that comes with SimpleIndex has its own built-in search interface that allows you to find and view the documents it contains on any computer with Microsoft Access. The default template for this search interface may be changed by modifying the forms in the file “BlankDB.mdb” in your installation folder. Warning: modifying the field names of the tables in this database will cause this wizard to no longer function with the default settings.
After selecting a data source, the wizard returns to the Database panel with the Datasource and Table or View list populated. Select the target table.
To open the database and use the search and reporting functions you must have the 32-bit version of the MS Access runtime, or use the full version of Access to convert it to a 64-bit database.