Scan Menu
Use TWAIN Driver[edit | edit source]
Check this option to use the TWAIN scanner driver. TWAIN is compatible with more scanners, but is slower than ISIS for most sheetfed document scanners. It is recommended that you use ISIS if your scanner supports it.
Use ISIS Driver[edit | edit source]
Check this option to use the ISIS scanner driver instead of the default TWAIN. ISIS scanning is faster and more stable than TWAIN scanning, particularly for high-speed document scanners. An ISIS license is required to use this option.
ISIS scanning is recommended for use with any document scanner that supports it. With ISIS, all scanner settings are saved to your SimpleIndex job file. This lets you specify job-specific scanner settings that load automatically when you open a job file.
Select Scanner[edit | edit source]
Displays the Select TWAIN or ISIS Source dialog, allowing you to select the scanner you wish to use with your SimpleIndex job.
Display Scanner Settings[edit | edit source]
Displays the TWAIN or ISIS settings dialog, allowing you to modify the resolution, page size, thresholds, and other scanner settings available with your model scanner.
ISIS scanner settings are saved to your job configuration file. Save the job configuration to save the new settings and use them whenever the current job is opened.
Most TWAIN scanners will “remember” the last settings used each time a new scan is performed. You should only need to modify the settings when scanning different types of documents.
Scanners that use the Window Imaging (WIA) TWAIN driver do not remember settings. For these scanners you should check the Display Settings Before Scan option to show the scanner settings before each new scan.
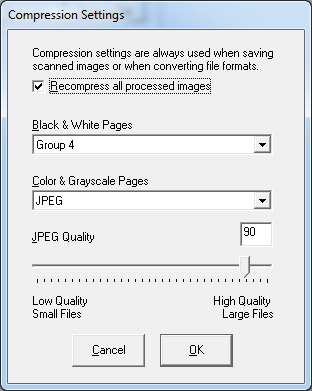
Set Compression Options[edit | edit source]
The compression settings are applied anytime an image is saved. This happens automatically when:
- Scanning images
- Importing multi-page TIFF files when the Split multi-page input files option is selected.
- PDF to TIFF conversion
- Exporting image files to a different file type
Recompress Images[edit | edit source]

Check this option to recompress both scanned and imported images that don’t match the compression settings specified in the Compression Options. Recompression takes place on export and may slow down processing significantly, depending on the source and output compression settings.
Black & White Pages[edit | edit source]
Set the compression type for 1-bit per pixel black & white images. Group 4 (fax) compression provides optimal compression without loss of image quality and is recommended in all cases.
Color & Grayscale Pages[edit | edit source]
Set the compression type for all color and grayscale images. JPEG compression is used by default. LZW is a lossless compression type and should be used instead of JPEG when image quality is the highest priority.
JPEG Quality[edit | edit source]
Manually set the JPEG quality setting to an exact value (1-100). More detail is retained with a higher quality setting, but the file size is also larger. JPEG compression is "lossy", meaning that some image resolution is lost in the compression process.

Display Settings Before Scan[edit | edit source]
When this menu option is checked, the scanner settings dialog is automatically displayed before each new scan.
Display Scan More Prompt[edit | edit source]
This checkable menu item causes SimpleIndex to ask the user if s/he wants to scan more pages into the current batch. This helps if the scanner’s hopper is not big enough for all the pages, or if a jam interrupts scanning before the batch is complete.
Split Pages Vertically[edit | edit source]
Automatically splits images vertically as they are scanned. This is very useful for scanning books on a flatbed scanner.
Split Pages Horizontally[edit | edit source]
Automatically splits images horizontally after they are scanned. Again, useful for scanning books on a flatbed scanner.
Magazine Scan[edit | edit source]
Use this option to scan booklets or magazines that have 2 pages printed side by side and folded down the middle without cutting. When this option is checked, pages are split down the middle, automatically rotated, and reordered, so each page is a single image in the proper order and orientation.
Scan to File[edit | edit source]
Lets you scan a document and save it to a single multi-page TIFF or PDF file. Useful for ad-hoc scanning of single documents without a batch configuration.
Rescan Page[edit | edit source]
When a batch is in progress, you may use this option to replace the current page with a newly scanned image.
Add Pages to File[edit | edit source]
Scan new pages and append them to the current TIFF or PDF file. Appending to other image formats is not possible.
Add Pages to Batch[edit | edit source]
Allows you to add more pages to the current batch after scanning has finished without rescanning or creating a new batch. All pages in the batch must be re-processed, losing any manual indexing or automatic processing like OCR and barcode recognition. This option should only be used to add pages to a manually indexed batch when a paper jam or other scanner issue causes scanning to end prematurely.
Add Scanned File to Batch[edit | edit source]
Scan a new multi-page file and add it as a new file for indexing in the current batch.
Add Existing File to Batch[edit | edit source]
Browse to select an existing file and add it as a new file for indexing in the current batch.
Insert Pages in File[edit | edit source]
Scan new pages and insert them before the selected page in the current file.
Insert Scanned File in Batch[edit | edit source]
Scan pages to a multi-page file and insert the file before the currently selected file in the batch.
Insert Existing File in Batch[edit | edit source]
Browse to select an existing file and insert it before the currently selected file in the batch.
Scan This File[edit | edit source]
Scans the current file. Used only in Update mode to scan and attach images to existing records in a database.
Use Match and Attach mode to perform this task automatically with batches of documents.